Free shipping for order over $50

Free shipping for order over $50
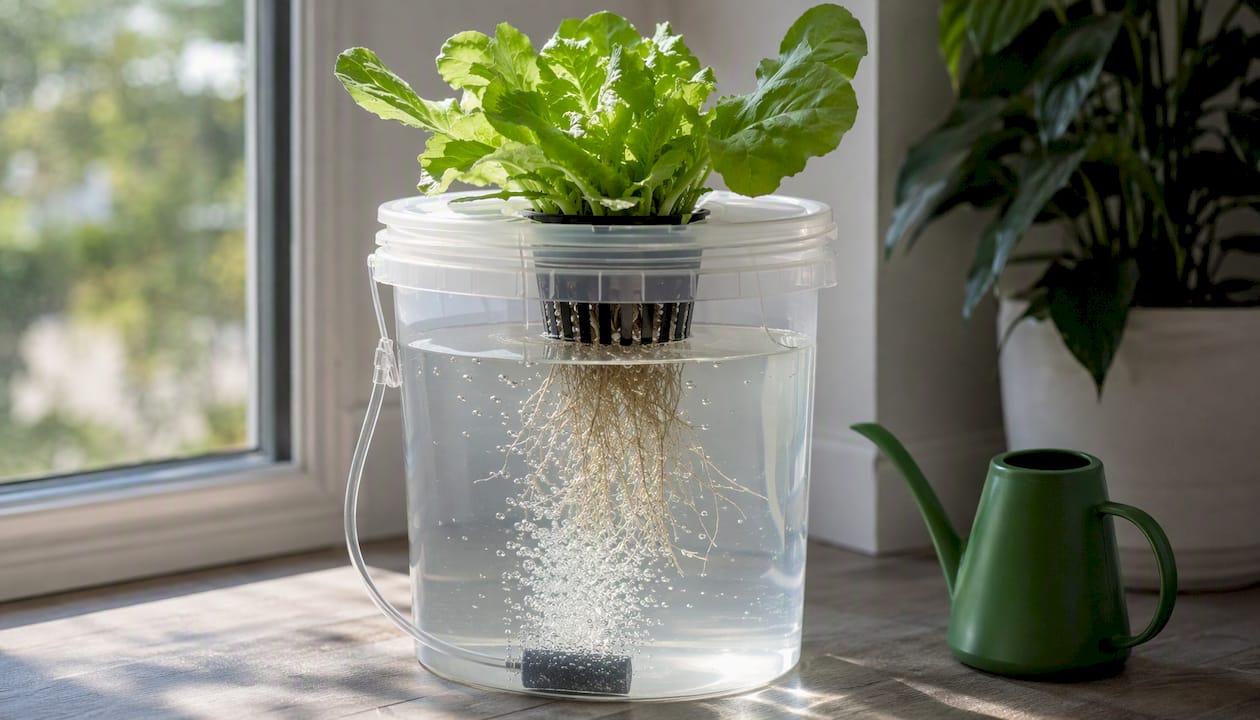
Build a 5-gallon DWC bucket with a 4–6 W air pump and a 3" net pot, and you can have lettuce roots in oxygenated nutrient solution quickly. For most beginners, that single bucket is the fastest path to a working deep water culture setup. If you want a multi-plant system without the guesswork, the Sprout-lab DWC Starter Kit handles the sizing and hardware decisions for you.
Quick-start checklist — get growing in under an hour:
A successful deep water culture setup comes down to three things: correct aeration, stable water temperature between 64°F and 68°F, and consistent monitoring of pH and EC every one to two days.
| Point | Details |
|---|---|
| Aeration is non-negotiable | Run your air pump 24/7 and size it at roughly 1 W per gallon; keep a spare on hand. |
| Temperature controls everything | Keep reservoir water at 64°F–68°F; above 72°F, dissolved oxygen drops and root rot risk rises sharply. |
| pH and EC targets by crop | Leafy greens: pH 5.5–6.0, EC 0.8–1.2 mS/cm; fruiting crops: EC — mS/cm. |
| Change the reservoir every 7–14 days | Small systems accumulate salts and deplete nutrients faster than large ones; fresh solution prevents most drift problems. |
| Sprout-lab DWC Starter Kit | Pre-matched components eliminate sizing guesswork; supports up to 56 plants with a 4.9/5 rating from 25,000+ orders. |
Deep water culture (DWC) is a hydroponic method where plant roots hang directly in an aerated, nutrient-rich water solution. No soil, no growing medium beyond a small starter cube. The roots get everything they need — water, minerals, and oxygen — from one reservoir.
The mechanics are simple. An air pump pushes air through an air stone sitting on the reservoir floor. That creates a constant stream of fine bubbles, which dissolves oxygen into the water and keeps the nutrient solution moving. Roots suspended in that oxygenated bath absorb nutrients far more efficiently than roots working through soil, which is why DWC accelerates vegetative growth so noticeably compared to container gardening.
How the parts connect (text diagram):
Net pot sits in a hole cut into the lid → plant stem held by clay pebbles in the net pot → roots grow down through the net pot into the reservoir → air stone rests on the reservoir floor → airline tubing runs from the stone up through the lid to the air pump sitting outside and above the reservoir.
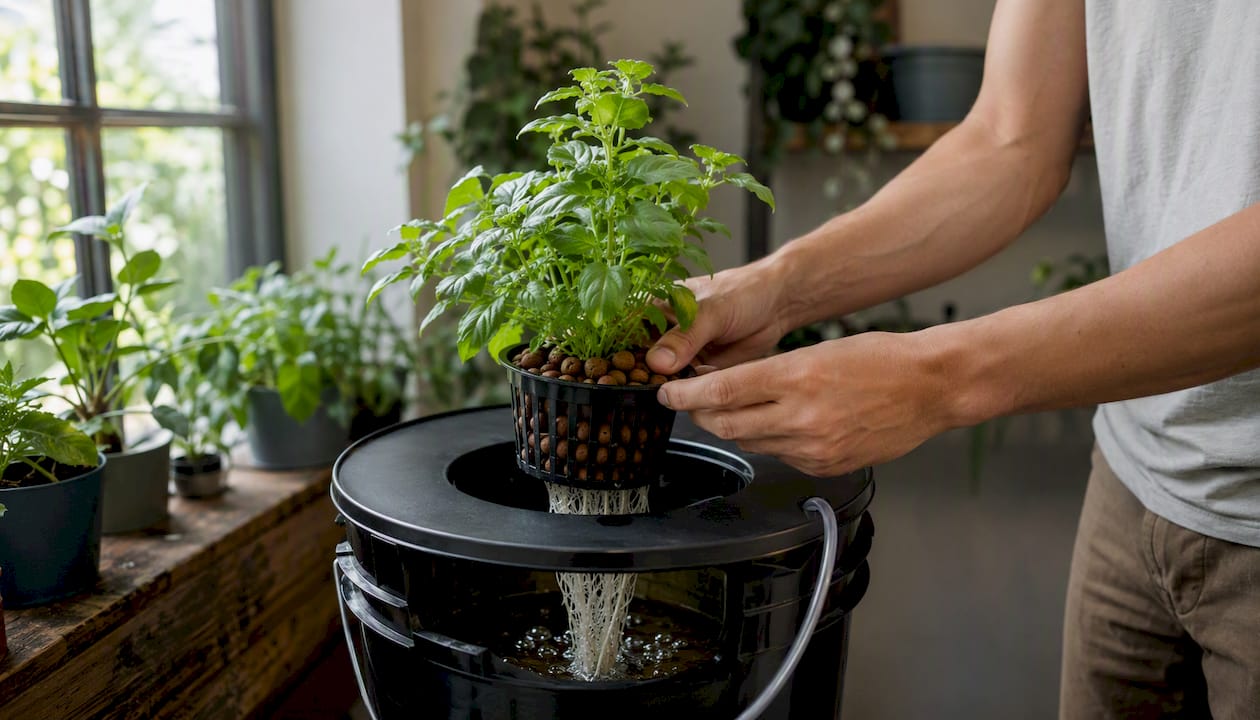
That’s the whole system. Three moving relationships: plant to net pot, roots to solution, air pump to stone.
Common DWC design variants:
DWC is also water-efficient compared with soil gardening, making it a practical choice for urban growers who want year-round leafy greens from a small footprint.
Why DWC works well:
Where DWC can fail you:
Practical mitigations:
Oregon State University Extension’s guidance on DWC specifically flags temperature control and aeration continuity as the two factors most likely to determine whether a beginner’s first grow succeeds or fails.
A DIY DWC bucket build commonly costs $25–$45 and requires fewer parts than most beginners expect. Here’s the complete list with U.S.-relevant specs:
| Component | Spec / Notes |
|---|---|
| Reservoir | 5-gallon opaque food-grade bucket (HDPE #2 or #5); never clear or translucent |
| Lid / net pot collar | 3" net pot hole cut into the lid; pre-drilled lids available at most hydro shops |
| Net pot | 3" mesh pot; clay pebbles or rockwool as the growing medium |
| Air pump | 4–6 W for a 5-gal; scale up roughly 1 W per gallon for larger reservoirs |
| Air stone | Sintered disc preferred over cylindrical; produces finer bubbles for better dissolved oxygen transfer |
| Airline tubing | Standard 3/16" ID silicone or vinyl; cut to length |
| Check valve | Prevents back-siphon if pump loses power; place it in the tubing line near the pump |
| Hydroponic nutrients | Two-part or three-part concentrate formulated for hydroponics (not soil fertilizer) |
| pH meter or drops | Digital pen meter is more reliable; calibrate weekly |
| EC/TDS meter | Measures nutrient concentration; budget pens work fine for beginners |
| Thermometer | Aquarium-style digital thermometer; clip to reservoir wall |
| Growing medium | Clay pebbles (hydroton) or rockwool starter cubes for seedlings |
Pump sizing by reservoir volume:
| Reservoir size | Minimum pump output | Recommended pump wattage |
|---|---|---|
| 5 gallons | ~1 LPM | 4–6 W |
| 10 gallons | ~2 LPM | 8–10 W |
| 17 gallons | ~3.5 LPM | 15–18 W |
| 27 gallons | ~5.5 LPM | 4–6 W |
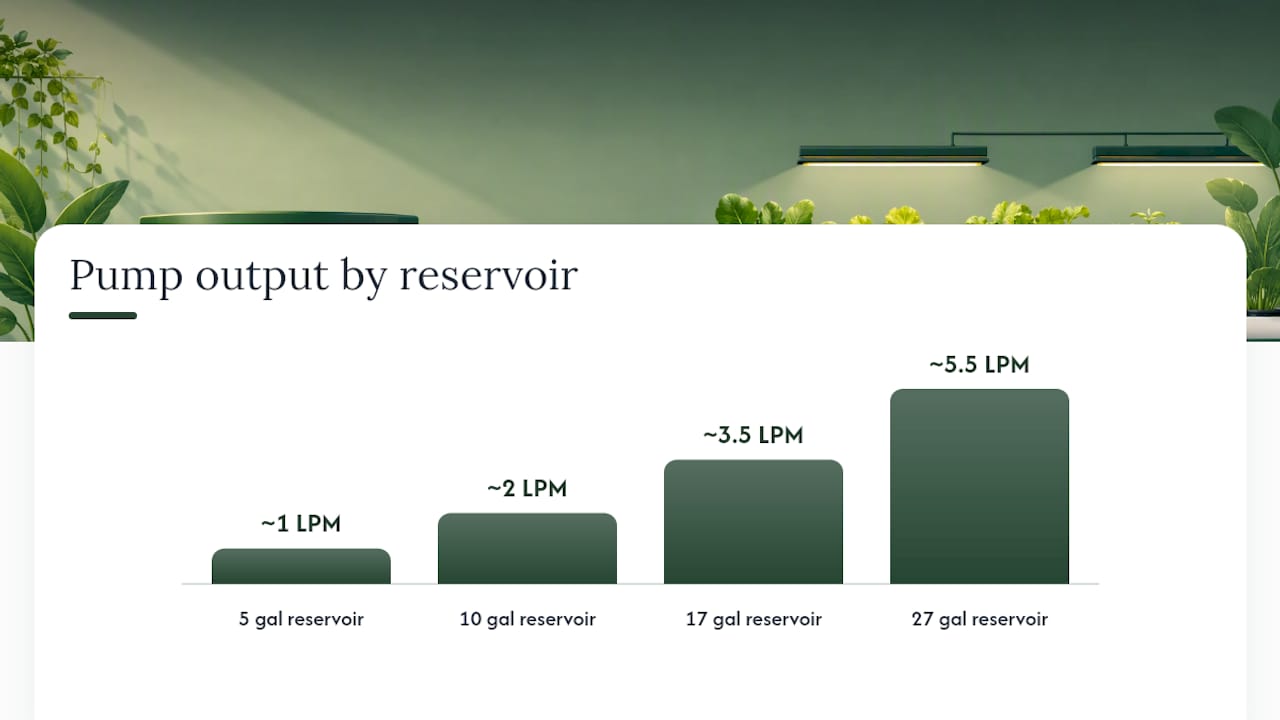
Sizing guidance from practical DWC guides recommends roughly 1 watt of pump power per gallon for small hobby systems, with sintered disc air stones preferred for dissolved oxygen efficiency.
Buying tips:
Pro Tip: Keep a spare air pump and a spare air stone in your grow space. Air stones clog with mineral deposits over time, and cheap pumps can fail without warning. A $12 backup sitting on a shelf has saved more grows than any expensive upgrade.
Assembly takes about 15 minutes. The first 24–48 hours of observation take longer, but the physical build is genuinely fast.
Build steps:
First 24–48 hour checklist:
Pro Tip: Don’t top off with plain water during the first week. The seedling isn’t drinking much yet, so EC will creep up if you add plain water to compensate for evaporation. Check EC before topping off and dilute only if it’s climbing above your target.
For a deeper look at transplanting seedlings into hydroponic systems without stress, the guide to growing hydroponic vegetables at home covers acclimation timing in detail.
Light and reservoir temperature are the two environmental levers that separate thriving DWC plants from struggling ones. Get both right and the system almost runs itself.
Light:
Leafy greens and herbs need 14–16 hours of light per day. Fruiting crops like tomatoes or peppers want 16–18 hours during vegetative growth, dropping to 12 hours to trigger flowering. For a small indoor bucket setup, a 200–400W equivalent LED panel hung 18–24 inches above the canopy covers a single-plant bucket comfortably. Full-spectrum LEDs with a color temperature around 4000–6500K work well for leafy crops.
Keep the light source from shining directly on the reservoir. Even a small gap in the lid can let enough light in to seed an algae bloom within a week.
Water temperature:
This is where most beginners get surprised. The target reservoir temperature is 64°F–68°F. At that range, dissolved oxygen stays high and Pythium has little opportunity to establish. Above 72°F oxygen solubility drops noticeably and root rot risk climbs. Oregon State University Extension specifically flags temperature management as critical for avoiding Pythium in DWC systems.
Passive cooling options that actually work: wrap the reservoir in closed-cell foam insulation, place it away from heat sources and direct sunlight, and run the air pump continuously (the bubbling itself has a mild evaporative cooling effect). If your grow space regularly hits 78°F or above, a small aquarium chiller is worth the investment.
Ambient environment:
Four readings determine whether your DWC system is healthy: water temperature, dissolved oxygen (DO), EC/TDS, and pH. Temperature and DO are the most urgent; EC and pH are the most frequently adjusted.
Target ranges:
The recommended DO target of 8–10 mg/L is achievable with a properly sized air pump and a sintered disc stone running 24/7. You don’t need a DO meter to hit that range — correct temperature and continuous aeration get you there reliably.
Check frequency:
Instrument notes:
Budget EC and pH pens in the $15–$30 range work fine for a single bucket. Calibrate your pH pen weekly with 4.0 and 7.0 buffer solutions — an uncalibrated pH pen is the most common reason beginners can’t figure out why their plants look off. A DO meter is optional for most home growers; if you’re running the right temperature and aeration, you’re almost certainly in range.
For a complete breakdown of mixing ratios and solution management, the balanced nutrient solution guide covers dilution math and top-off calculations.
Maintenance schedule:
Troubleshooting:
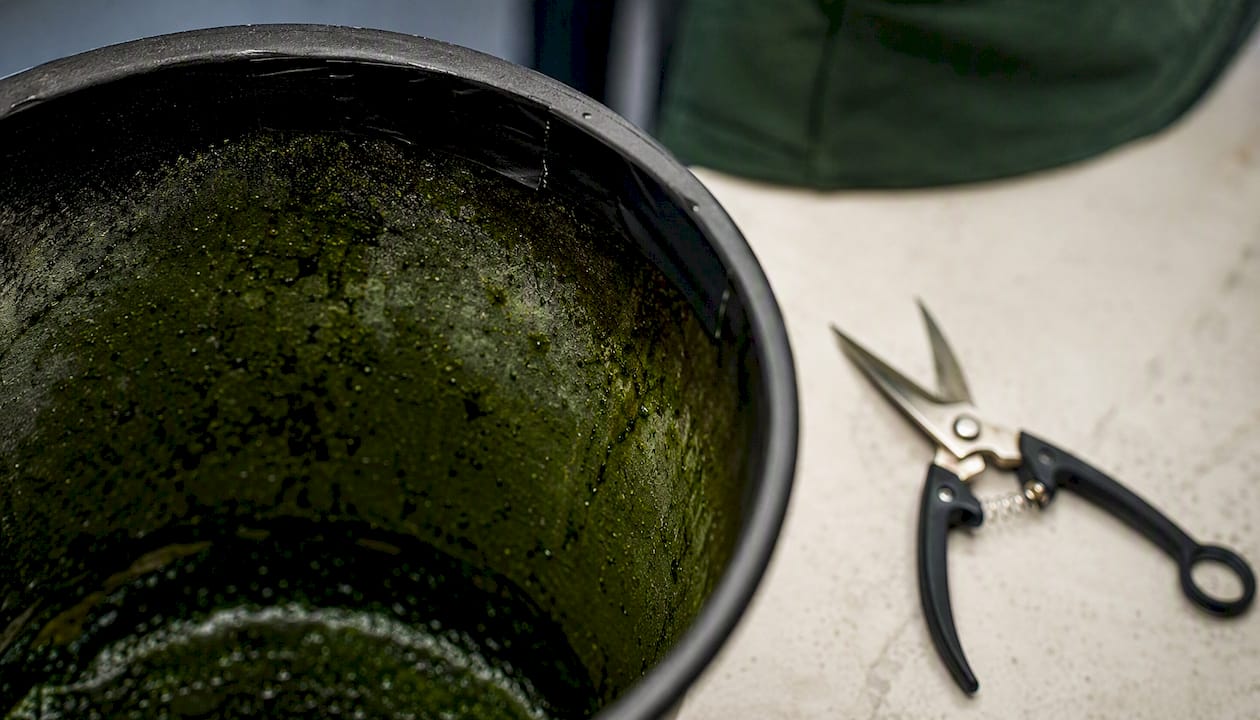
Algae (green slime on reservoir walls or roots)
Cause: light reaching the reservoir. Fix: cover all light gaps with black tape or foam, wrap the bucket in a reflective sleeve, and do a full reservoir change. Algae won’t kill plants immediately but competes for oxygen and clogs the air stone.
Brown, slimy roots with a foul smell
Cause: Pythium (root rot), almost always triggered by warm water or an aeration failure. Remove any severely affected root mass with clean scissors. If the plant is still alive and the roots have some white sections remaining, recovery is possible.
Pump failure
Cause: motor burnout, clogged diaphragm, or power interruption. Fix: replace immediately with your spare pump. Plants in a warm reservoir can begin showing stress within 2–4 hours of aeration loss. This is why the spare pump on the shelf matters.
pH drift (rising or falling between checks)
Cause: plant uptake, microbial activity, or nutrient imbalance. Fix: adjust with pH-up or pH-down in small increments (0.5 mL at a time, stir, recheck). Rapid pH swings often indicate it’s time for a full reservoir change.
EC spike (nutrient concentration climbing)
Cause: evaporation without topping off, or plants drinking more water than nutrients. Fix: top off with plain pH-adjusted water rather than nutrient solution until EC returns to target.
Dilute bleach (1 tablespoon per gallon) also works; rinse extremely well afterward and let the bucket air dry before refilling.
Leafy greens and fast-cycling herbs are the best first crops for any DWC setup. They have short lifecycles, tolerate the EC ranges a beginner is likely to hit, and show results fast enough to keep you motivated.
Best beginner crops:
For a broader list of crops matched to home hydroponic systems, the best plants for your hydroponic system guide covers variety selection and spacing.
Crops to approach with caution:
Large fruiting plants like indeterminate tomatoes, cucumbers, and squash can work in DWC, but they demand significantly higher EC (1.8–3.5 mS/cm depending on stage), larger reservoirs (10+ gallons per plant), and more frequent monitoring. A single 5-gallon bucket is too small for a full-season tomato. If you want to grow fruiting crops, move to a 10–17 gallon reservoir or an RDWC setup where you can manage nutrient concentration across multiple plants more precisely.
Fruiting crops also change their EC needs dramatically between vegetative and flowering stages, which means your maintenance cadence doubles in complexity. Master lettuce first.
Harvest tip: once you’ve grown a few rounds of lettuce, try pairing your harvest with a clear vegetable and ginger soup or a seven-vegetable couscous to make the most of fresh-cut greens.
The most important scaling rule: divide, don’t enlarge. One 27-gallon reservoir is harder to manage, heavier to drain, and riskier to lose than three 9-gallon buckets running the same total volume. Oregon State University Extension recommends dividing large systems into multiple tanks to localize leaks, simplify nutrient management across growth stages, and reduce the impact of a single failure.
Weight and structural considerations:
Water weighs 8.34 lbs per gallon. A 5-gallon bucket fully loaded runs about 42 lbs — manageable on any solid shelf or table. A 27-gallon tote hits roughly 225 lbs when full. That’s a floor load, not a shelf load. Before filling anything larger than 10 gallons, confirm the surface can handle the weight and that the reservoir sits level within about 1 inch (uneven reservoirs cause uneven water levels in linked systems and can stress bulkhead fittings).
Install a bulkhead drain fitting in any reservoir larger than 10 gallons. Trying to drain a 17-gallon tote by tipping it is how floors get wet and backs get hurt.
Electrical safety at scale:
RDWC vs. linked standalone buckets:
RDWC (recirculating DWC) connects multiple buckets to a central reservoir via a water pump, which circulates solution continuously. It’s more consistent across plants but adds a water pump, more tubing, and more potential leak points. Linked standalone buckets (each with its own air pump, connected only by a shared nutrient mixing routine) are simpler to troubleshoot and easier to isolate if one plant gets sick. For most home growers running fewer than 8 plants, linked standalone buckets are the better call. RDWC makes sense when you’re running 10+ plants and want automated top-off and consistent EC across the whole row.
For more on compact growing systems for urban spaces, Sprout-lab’s guide covers layout options for apartments and small homes.
The Sprout-lab DWC Starter Kit follows principles of correct reservoir sizing and included aeration hardware, designed for modularity and ease of scaling. It enjoys high customer ratings and supports a range of plant counts suitable for urban growers.
Honest comparison with DIY:
A DIY 5-gallon bucket build costs $25–$45 and is a great learning exercise. If you want to understand every component, build the bucket first. The Sprout-lab kit makes more sense when you want reliable multi-plant production without sourcing each part separately, or when you’ve already run a bucket and want to step up without the trial-and-error of scaling a DIY rig.
Buyer signals that point to the kit:
Contact Sprout-lab’s support team with setup questions — the team is familiar with the specific hardware in the kit and can walk you through first-run calibration.
There’s a pattern among growers who struggle with DWC: they start with a large system before they’ve learned to read the small signals a single bucket sends. A 5-gallon bucket is a teaching tool as much as a growing tool. It shows you how fast pH drifts in your tap water, how quickly EC climbs when a plant isn’t drinking, and what healthy white roots actually look like versus the early brown tinge that precedes rot.
The controls in DWC aren’t complicated, but they interact. Warm water drops dissolved oxygen, which stresses roots, which makes them more susceptible to Pythium, which causes pH to swing as microbial activity increases. You learn that chain by watching one bucket closely for a few weeks, not by managing eight buckets simultaneously while still figuring out your pH pen.
Start with lettuce in a single bucket. Run it through one full cycle. If your roots stay white, your pH holds within 0.3 of your target between checks, and your EC tracks predictably, you’re ready to scale. That’s the real qualification test, and it’s one most beginners can pass in 30–45 days.
The spare pump and spare air stone aren’t optional accessories. They’re the difference between a minor inconvenience and a dead plant. Keep them on the shelf before you start your first grow, not after your first pump failure.
Growing lettuce in a single 5-gallon bucket proves the concept. Moving to reliable multi-plant production is where most growers hit friction: sourcing matched components, sizing pumps correctly for larger reservoirs, and figuring out how to expand without rebuilding everything.

Sprout-lab’s modular hydroponic systems remove that friction. The kits are pre-matched — reservoir, pump, air stone, and net pots are sized to work together — so you skip the compatibility guesswork that trips up DIY scaling. With support for up to 56 plants in a compact footprint and a 4.9/5 star rating from over 25,000 orders, the system is built for urban growers who want results, not a parts-sourcing project.
If you’re ready to move beyond the test bucket, browse the automated hydroponic setup options to find the configuration that fits your space and plant count. The reservoir hydroponic system beginner’s guide is also a good next read if you want to compare DWC against other reservoir-style formats before committing.
Lettuce, basil, spinach, arugula, mint, cilantro, and kale are the most reliable DWC crops for beginners. They thrive at EC 0.8–1.2 mS/cm and pH 5.5–6.0, and most produce a harvestable crop within 30–45 days of transplant.
The three core components are the reservoir (an opaque food-grade bucket or tote), the net pot and growing medium (which hold the plant above the solution), and the aeration system (air pump, air stone, and tubing that oxygenates the nutrient solution continuously).
DWC is sensitive to water temperature and completely dependent on continuous aeration. If the air pump fails or the reservoir climbs above 72°F, roots can begin suffocating within hours, and Pythium root rot can establish quickly in warm, low-oxygen conditions.
Yes. A single 5-gallon bucket DWC build requires about 8–10 parts and typically costs $25–$45 in the U.S. The build takes roughly 15 minutes, and the system can be running with a seedling the same day. Sprout-lab’s DWC Starter Kit is a pre-matched alternative for growers who want to skip the parts-sourcing step.