Free shipping for order over $50

Free shipping for order over $50
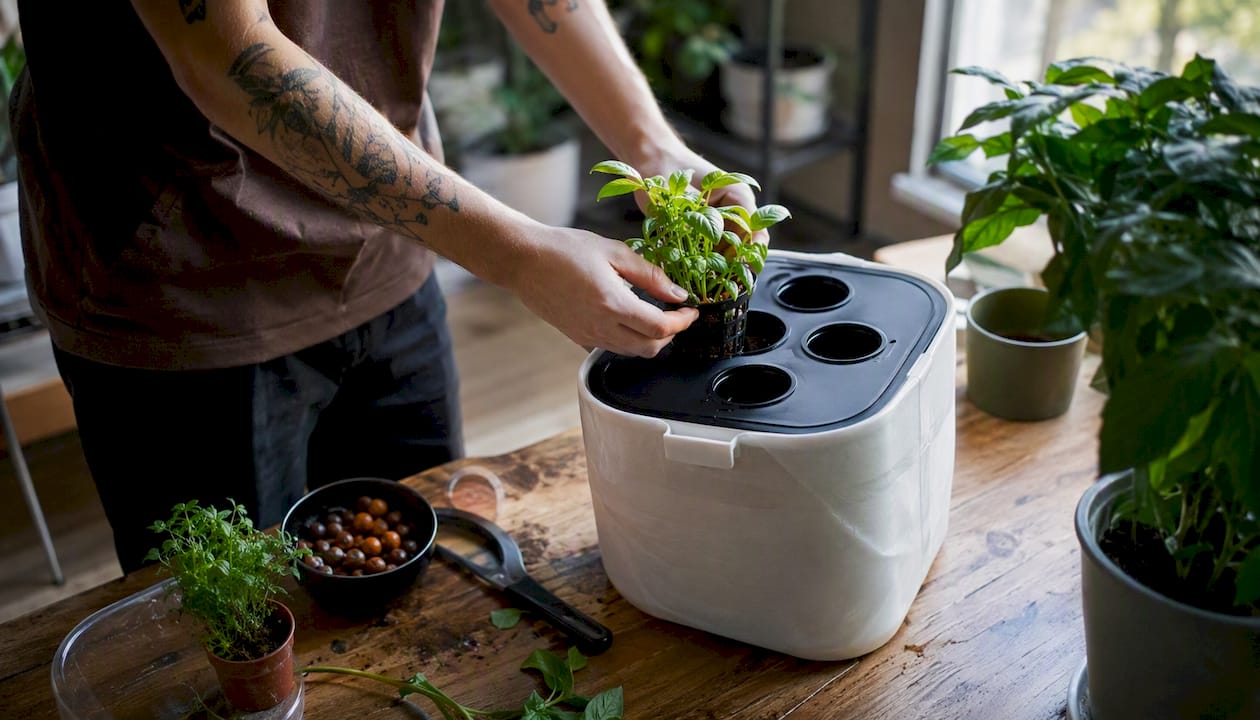
You can get a working hydroponic garden running in a single weekend by picking one simple system, gathering five core items, and following a short first-week routine. The fastest, lowest-risk starting point is a Kratky mason jar or a single-bucket deep water culture (DWC) setup, planted with lettuce or basil. Skip the fancy commercial rigs for now. You don’t need them to get your first harvest.
Here’s what to do before you read another word:
Expect your first real harvest, if you plant lettuce or basil, in a few weeks. The one thing that will make or break your first attempt is pH. Check it early, check it often, and resist the urge to fiddle with everything else at once.
Success with your first hydroponic garden comes down to choosing a low-fail system, checking pH every 2 to 3 days, and starting with forgiving crops like lettuce or basil.
| Point | Details |
|---|---|
| Start simple | Choose Kratky or single-bucket DWC over complex systems for your first attempt. |
| Watch pH first | Test every 2 to 3 days and keep it between 5.5 and 6.5 for nutrient uptake. |
| Grow forgiving crops | Lettuce, basil, spinach, and microgreens tolerate beginner mistakes best. |
| Expect a 3 to 6 week timeline | Most leafy greens and herbs are harvest-ready within a few weeks. |
| Consider a ready-built system | Sprout-lab’s compact systems remove DIY setup errors for first-time growers. |
Hydroponics means growing plants without soil, feeding roots directly through a nutrient-rich water solution instead. That’s the whole concept in one sentence, and it’s less complicated than most gardening blogs make it sound.
Plants need four things to grow, whether they’re in dirt or not: water, nutrients, oxygen at the root zone, and light. Soil happens to be a decent delivery system for the first two, but it’s not the only one. Hydroponics replaces soil with a nutrient solution and a growing medium like rockwool or LECA (lightweight expanded clay aggregate) that holds roots in place while staying open enough for oxygen to reach them. Cut soil out of the equation and you also cut out most of the pests, weeds, and guesswork that come with it. Hydroponic setups use less water than dirt gardening and let you grow through the winter on a windowsill, according to the Old Farmer’s Almanac.
Picture four boxes in a row: Water, Nutrients, Oxygen, Light. Every hydroponic system, no matter how simple or complicated, is just an arrangement built to deliver those four things reliably. A Kratky jar delivers them passively. A DWC bucket adds a pump to push more oxygen into the mix. Everything else is a variation on that same idea.
The systems that fail aren’t usually missing something exotic. They’re missing one of the four basics: not enough oxygen at the roots, pH locking out nutrients, or light that’s too weak or too far away. Nail those four, and the plant does the rest.
Start with Kratky if you want the simplest possible entry point. Move to single-bucket DWC if you want slightly faster growth and don’t mind running a small air pump.
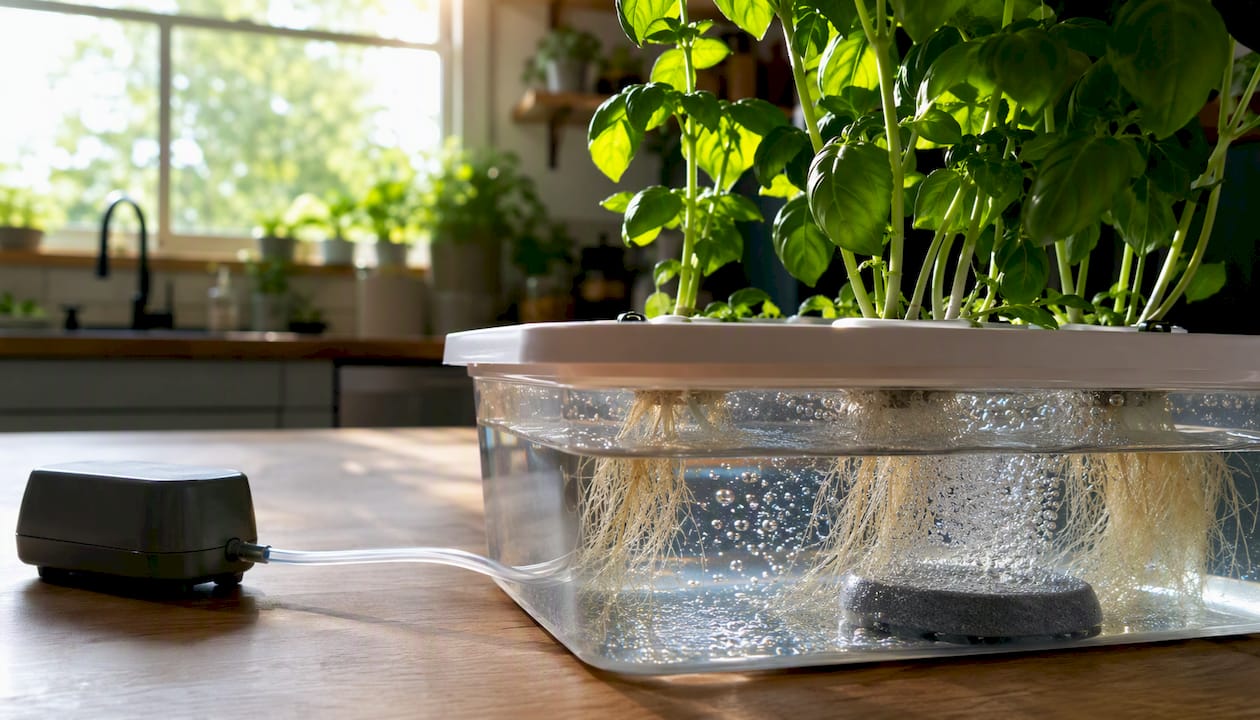
Kratky is a passive, non-circulating method: no pumps, no electricity, no moving parts. You fill a container with nutrient solution, suspend a net pot with a seedling above it so the roots dangle into the liquid, and as the plant drinks the water level, an air gap naturally opens above the roots. That air gap is the whole trick. It’s what keeps roots oxygenated without a pump, and it’s why Kratky works so well for a first attempt, since the failure points are limited to pH, nutrient strength, and light.
DWC takes that same idea and adds continuous aeration. An air pump and stone keep bubbles moving through the reservoir around the clock, which means roots get more dissolved oxygen and plants tend to grow a bit faster. The tradeoff is that DWC has one more thing that can break: the pump. If the Georgia Extension’s home hydroponics guide makes one point clear, it’s that DWC is cheap to build but depends entirely on that aeration running without interruption.
| System type | Cost to start | Complexity | Electricity needed | Main failure point |
|---|---|---|---|---|
| Passive Kratky | Very low | Minimal | None | pH drift, nutrient strength |
| Single-bucket DWC | Low to moderate | Moderate | Yes (air pump) | Pump failure, oxygen loss |
| Wick system | Low | Moderate | None | Slow nutrient uptake, wick clogging |
| Small commercial kit | Moderate to higher | Low (preassembled) | Usually yes | Cost, less customization |
Match the system to your space and your patience level:
You need five categories of gear, and none of them are exotic. Most are available at a hardware store, garden center, or online retailer in a single afternoon.
A few extras aren’t strictly required but solve problems before they start: opaque tape or foil to seal any light leaks into the reservoir, a small thermometer/hygrometer to track your grow space, and seed-starting trays if you’re planting more than a couple of seeds at once.
For nutrients, buy a one-part concentrate marketed for leafy greens rather than a two-part or three-part professional blend. One-part formulas are pre-balanced, which removes one of the more common beginner mistakes: mixing nutrient ratios wrong. Sprout-lab’s all-in-one liquid nutrient formula is built around this same logic for readers who’d rather not measure three separate bottles on day one.
Pro Tip: Buy the cheapest reliable digital pH meter you can find rather than the cheapest possible pH test strips. Strips are hard to read accurately, and misreading pH by even half a point is enough to lock out nutrients your plants desperately need.
Building a Kratky jar or a single-bucket DWC takes under an hour once your parts are on the table. Here’s the order that avoids the most common mistakes.
Your first week matters more than any other. Run lights for 14 to 16 hours a day on a timer so you’re not relying on memory. Do a quick visual check every morning: water level, leaf color, root color if visible. Check pH within 48 hours of starting, then every 2 to 3 days after, since it’s the single most common reason beginner setups fail. Expect germination within about a week for lettuce and basil, with transplant-ready seedlings showing true leaves shortly after.
If you spot green film building up on the inside of a clear container, that’s algae, and it means light is reaching your nutrient solution. Wrap the container in foil or opaque tape immediately. For Kratky specifically, resist the urge to top off the reservoir. That shrinking water level is what creates the air gap your roots need to breathe. For DWC, if your pump ever stops, treat it as urgent: roots without aeration can start to suffocate within hours, not days.
Start seeds in rockwool or coco coir starter cubes rather than dropping them straight into your reservoir. Cubes hold moisture evenly and let you check root development before committing a seedling to the main system.
Soak your cubes in pH-adjusted water first, then tuck one or two seeds about a quarter inch deep into each. A seedling heat mat and a humidity dome speed up germination noticeably, especially for basil, which likes warmth more than lettuce does. Space cubes so leaves won’t crowd each other once they sprout. If you started seeds in potting soil instead (some beginners do, using what they already have), gently rinse every trace of soil off the roots before transplanting. Soil particles in a hydroponic reservoir invite bacteria and clog pumps.
You’ll know a seedling is ready to move when white roots are visibly poking through the bottom of the starter cube, usually alongside a first set of “true leaves” that look different from the initial rounded seed leaves. Nestle the cube into a net pot filled loosely with growing medium so the roots hang free into the water or solution below. Keep your light closer at this stage, around 8 to 10 inches, since young seedlings can’t handle the same intensity as mature plants.
For the first 7 to 14 days after transplant, expect a short adjustment period where growth looks slow. That’s normal. Roots are extending down toward the solution and establishing themselves. Don’t panic and increase nutrient strength to “help” during this window. Half strength is still correct here. Sprout-lab’s guide on transplanting seedlings into a hydroponic system walks through this transition step by step if you want visual reference points.
Keep pH in a mildly acidic range suitable for most crops, with leafy greens doing best in a slightly lower part of that range. This one number matters more than almost anything else in your first month.
Here’s why: nutrients can be sitting right there in the water, fully available, and your plant still won’t be able to absorb them if pH drifts outside that window. Roots simply lock the nutrients out. pH drift is the single most common reason beginner hydroponic gardens fail, and it happens gradually as plants consume nutrients and shift the solution’s chemistry, which is exactly why a 2 to 3 day check cadence matters more than any other maintenance task on your list.
Mix your nutrient concentrate at half the label’s recommended strength for your first two weeks. Full strength is easy to add later once you see how your plants respond, but it’s much harder to walk back after burning young roots. Once seedlings show strong growth, ramp up to full strength gradually. Sprout-lab’s guide to balanced nutrient solutions breaks down dosing by plant type if you’re growing more than one crop at once.
Pro Tip: Test and adjust your nutrient solution’s pH again about 20 minutes after mixing, not immediately. Concentrates need a few minutes to fully dissolve and stabilize, and testing too early can give you a false reading.
Water management is simpler than most guides make it sound. Top off Kratky jars only with plain, pH-adjusted water, never fresh nutrient solution, since the goal is to let the water level drop and expose roots to air. For DWC, top up with diluted nutrient solution as levels drop, and plan a full reservoir change every 2 to 3 weeks depending on plant size and how cloudy the water gets. If you’re using tap water, let it sit out uncovered for 24 hours before use. That gives chlorine time to off-gas naturally. Some municipal water supplies use chloramine instead of chlorine, which doesn’t dissipate the same way and needs an activated carbon filter to remove.
Leafy greens and herbs need many hours of light daily when grown indoors without direct sun. A cheap outlet timer removes the guesswork and keeps your schedule consistent even when you forget.
LED grow panels have become the practical default for small indoor setups. They run cooler than older fluorescent shop lights, use less electricity, and last longer, making them the better long-term investment even though the upfront cost is a bit higher. Look for a panel with an adjustable hanging height so you can start close to seedlings and raise it as plants mature. As a rough guide, keep lights 12 to 18 inches above mature leafy greens and closer, around 8 to 10 inches, for young seedlings.
Temperature matters more than most beginners expect. Aim for moderate indoor temperatures comfortable for most leafy greens and herbs, with basil preferring warmer conditions and lettuce cooler ones. A basic room thermometer is enough to track this; you don’t need anything specialized.
Pro Tip: Point your fan so it gently sways the plants rather than blasting them directly. That light movement mimics outdoor wind and builds sturdier stems, which matters a lot if you eventually move plants outside.
Set a simple maintenance rhythm and most problems never get the chance to start. Check visually every day, test pH every 2 to 3 days, top off water weekly, and plan a full reservoir change every 3 to 4 weeks.
When something goes wrong, the fix is usually faster than it feels in the moment:
If your air pump stops running in a DWC system, treat it as an emergency, not a maintenance item for later. Roots can begin struggling within hours without aeration, and a battery-powered backup air stone is a cheap insurance policy worth having on hand before you ever need it.
Lettuce, basil, spinach, microgreens, and mint are the five most forgiving crops for a first hydroponic attempt. All five tolerate beginner mistakes well and reward you with a fast harvest, which matters more than most people realize when you’re still learning your system’s quirks.
Skip fruiting plants like tomatoes and peppers for your first attempt. They need far more light, longer grow cycles measured in months rather than weeks, and often require manual pollination indoors since there’s no wind or bees to do it for you. Sprout-lab’s list of easy hydroponic vegetables covers a few more low-risk options if you want variety beyond the core five.
For a standard countertop bucket, start with one or two plants. A mason-jar Kratky setup is built for exactly one plant. Crowding more seedlings into a small system just competes for the same light and nutrient volume, which slows everyone down rather than speeding anyone up.
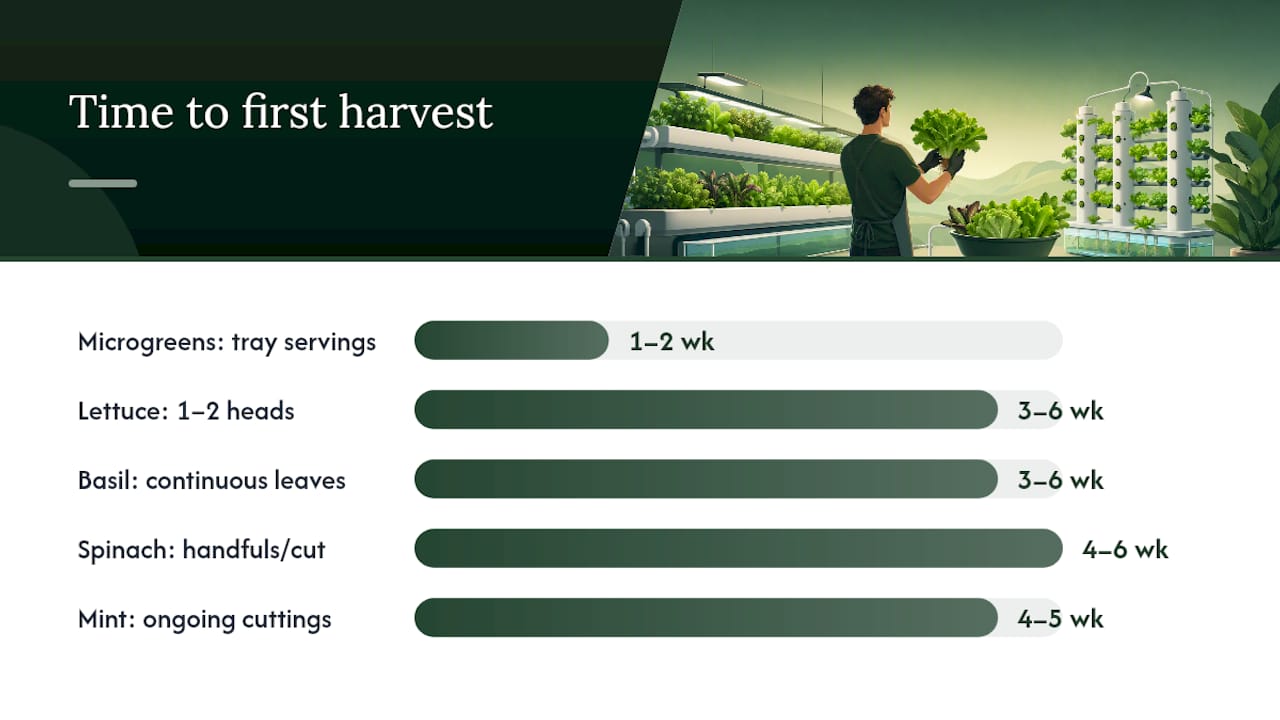
Microgreens are ready in 1 to 2 weeks. Lettuce and basil typically take 3 to 6 weeks from seed to a usable harvest. Slower crops stretch well beyond that window, which is exactly why they’re not recommended for a first attempt.
| Crop | Time to first harvest | Beginner yield estimate |
|---|---|---|
| Microgreens | 1 to 2 weeks | Small tray, several servings |
| Lettuce | 3 to 6 weeks | 1 to 2 heads per plant |
| Basil | 3 to 6 weeks | Continuous leaf harvest for months |
| Spinach | 4 to 6 weeks | Several handfuls per cutting |
| Mint | 4 to 5 weeks, then ongoing | Continuous cuttings for months |
A single mason-jar Kratky setup will realistically give you one lettuce head or one basil plant’s worth of continuous leaves. A small multi-pot DWC bucket with two or three net pots scales that up proportionally, though you’re still working with a countertop-sized harvest rather than anything that replaces a grocery trip. That’s fine. The point of a first setup isn’t self-sufficiency. It’s proof that you can keep a plant alive and thriving without dirt, and building the habits that make a second, larger system worth the investment.
A bare-bones Kratky build can cost very little by using repurposed containers, basic pH testing, and a small bag of growing medium. A more reliable starter setup with an LED light, proper nutrients, and a decent digital pH meter typically lands between $150 and $250.
To keep costs down without cutting corners that actually matter, reuse containers you already own rather than buying a dedicated reservoir, buy concentrated nutrients instead of pre-mixed bottles (concentrate lasts far longer per dollar), and commit to one system before buying parts for a second. Spreading your first budget across two half-finished setups is a common beginner mistake that leaves you with neither working well.
Clean equipment prevents most of the disease and contamination problems beginners run into. A few simple habits go a long way here.
When it’s time to dispose of used nutrient solution, avoid dumping large volumes down storm drains where local rules restrict it; check your municipality’s guidance, since most residential kitchen-sink disposal in small quantities is fine but varies by area. Growing medium like rockwool isn’t compostable, but LECA pellets can often be rinsed and reused across multiple grow cycles, which cuts down on both cost and waste over time.
Sprout-lab builds compact hydroponic systems specifically for people who don’t have a backyard, a greenhouse, or years of gardening experience to draw on. The modular design fits urban apartments and can scale up to support as many as 56 plants in a footprint that would barely hold a single raised garden bed outdoors.
For a first-time grower, the appeal isn’t complexity. It’s the opposite. A ready-built system removes the guesswork around lid holes, net pot sizing, and pump compatibility that trips up a lot of DIY attempts in week one. Sprout-lab pairs its systems with starter nutrient packs and beginner-focused guides so you’re not left mixing concentrate ratios from scratch on your first night.
Beginners lose momentum when a DIY build hits a snag they didn’t expect, like a lid that doesn’t seal or a nutrient ratio that’s off. A system built to remove those variables gets a first-timer to an actual harvest faster than a project pieced together from mismatched parts.
This fits best for a busy urban beginner who wants a low-fail setup without spending a weekend at the hardware store piecing one together, and who’d rather spend that time watching plants grow than troubleshooting a leaky lid.
We’ve walked plenty of first-time growers through their opening week, and the pattern is almost always the same: the people who succeed aren’t the ones with the fanciest setup. They’re the ones who checked pH consistently and left everything else alone. If you take one thing from this guide, let it be that. Resist the urge to tweak your nutrient mix, your light height, and your pH all in the same afternoon. Change one variable, watch what happens, then adjust again.
For readers who want a next step without building from scratch, our guide to growing hydroponic vegetables at home is a good place to keep learning once your first system is running.
If drilling lids and sourcing net pots isn’t how you want to spend your first weekend, a plug-and-play system skips straight to the growing part. Sprout-lab’s compact hydroponic systems come with the reservoir, net pots, and starter nutrient pack already sorted, so setup is closer to an hour than an afternoon.

Each system ships with a beginner guide covering your exact first-week routine, and Sprout-lab’s support resources stay available if a question comes up after day one. The Compact Hydroponic System is built for small apartments and countertops and scales from a single tray up to dozens of plants as you get more comfortable. If you’d rather start with the simplest possible passive setup, the passive hydroponic starter bundle mirrors the Kratky approach covered earlier in this guide, just without the drilling. Check current availability and pick the system that matches the space you actually have.
A few resources worth bookmarking once your first system is up and running:
Pick a passive Kratky jar or a single-bucket DWC system, gather five core items (container, net pots, growing medium, nutrients, and a pH kit), and plant a forgiving crop like lettuce or basil to start.
A working system needs a container for nutrient solution, a growing medium to support roots, a way to deliver oxygen (either passively through an air gap or actively with a pump), light, properly balanced nutrients, and a pH kept between 5.5 and 6.5.
Hydroponic systems depend on consistent power for pumps and lights in active setups, require more frequent monitoring than soil (especially for pH), have a higher upfront cost than a soil pot, carry a risk of total crop loss if a pump fails, and demand more attention to sanitation since there’s no soil to buffer mistakes.
Microgreens are ready in 1 to 2 weeks, while lettuce and basil typically reach harvest in 3 to 6 weeks from seed, depending on light and temperature conditions.
Kratky is the better starting point because it has no pump to fail and fewer variables to manage, while single-bucket DWC is a good next step once you want slightly faster growth and don’t mind maintaining continuous aeration.