Free shipping for order over $50

Free shipping for order over $50
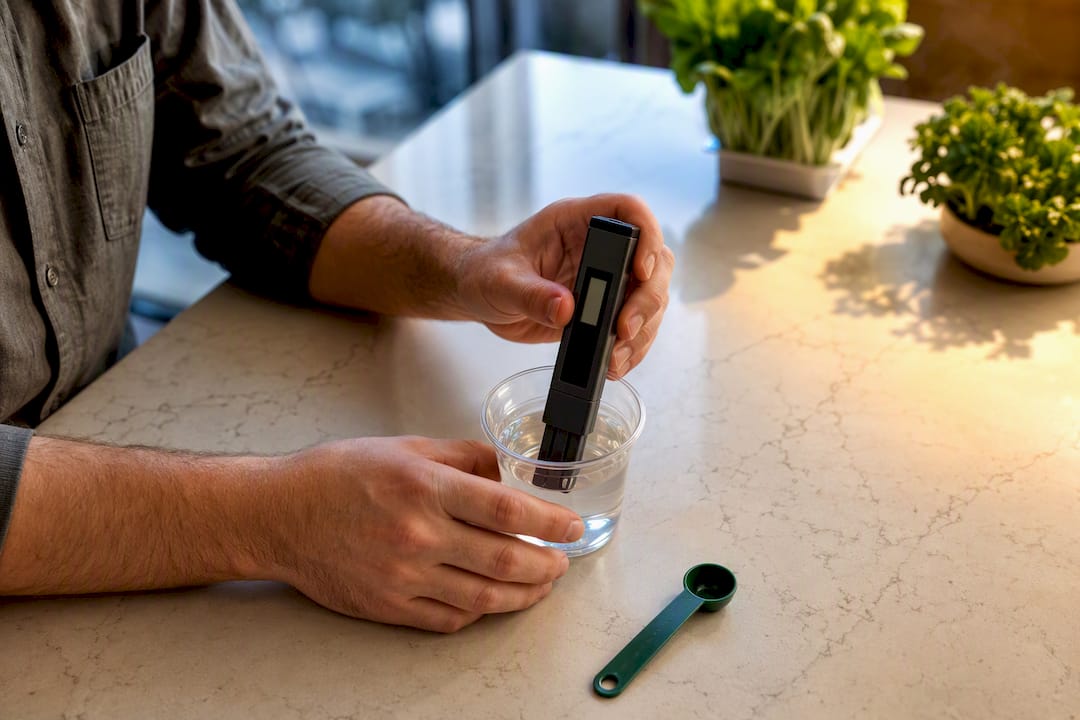
Use tap water for hardy houseplants when your tap tests below roughly 200 ppm TDS. Switch to filtered water for sensitive specimens like calatheas and orchids, and reach for distilled or RO only in precision hydroponic setups where you’re dosing nutrients from zero. Whatever you pick, test your water’s TDS or EC first. That single reading decides everything else.
TL;DR:
- Tap water with a TDS below 200 ppm is generally safe for hardy houseplants, but sensitive species often require filtered or distilled water.
- High background TDS above 300 ppm in tap water warrants switching to reverse osmosis or distilled water for optimal plant health and growth control.
- Chloramine in municipal water needs carbon filtration or RO to be removed, as it does not off-gas like chlorine and can accumulate over time.
- When using distilled or RO water, adding Cal‑Mag first and testing EC and pH daily prevents deficiencies and maintains stable nutrient uptake.
- Replacing hydroponic solutions every one to two weeks avoids sodium and chloride buildup, which can reduce growth and cause root damage.
Not every grow needs the same water. Match your setup to the right choice below, and you’ll skip weeks of unexplained leaf spotting or stunted roots.
The pattern here isn’t really tap versus distilled. It’s how much control your plants demand.
EC and TDS measure the same thing from two angles: EC reads electrical conductivity, TDS estimates total dissolved solids, and both tell you how many ions are already floating in your water before you add a single drop of nutrient. High background TDS eats into your dosing headroom. If your tap water carries 250 ppm of calcium carbonate and random minerals, you have less room to add the specific nutrient ratios your plants actually need.
Sodium and chloride are the quiet killers. They don’t feed plants, but they accumulate in reservoirs and growing medium over repeated top-offs, eventually damaging root hairs and slowing water uptake. This is the reservoir version of over-salting soil, just less visible.
Carbonate hardness (the bicarbonates in most municipal tap water) buffers pH upward over time, which is why growers using untreated tap often fight a slow, stubborn pH climb no matter how much down solution they add. Chlorine typically off-gasses within 24 hours if you let water sit uncovered. Chloramine doesn’t. It’s a more stable chlorine-ammonia compound that requires carbon filtration or reverse osmosis to remove, a distinction Smart Hydro Lab flags as one of the most commonly missed water-chemistry details among home growers.
You don’t need a lab. You need three cheap tools and about five minutes.
Once you have numbers, the decision gets simple. Under 200 ppm TDS, tap usually works untreated. Between 200 and 300 ppm, hardness and chloramine content decide it. Above 300 ppm, RO or diluting with distilled water becomes the more reliable route, a threshold echoed in Smart Hydro Lab’s practical grower guidance. Letting water sit overnight clears chlorine but does nothing for chloramine. Only a carbon filter or RO membrane handles that.
Distilled and RO water both start at essentially zero EC, meaning there’s no calcium or magnesium already in the mix. Skip that step and you’ll see interveinal yellowing within days, even if your base nutrients are mixed exactly per the label.
Pro Tip: Keep a small notebook or phone note logging your EC after each addition during mixing. Distilled water gives you a clean slate, and that same blank slate makes it painfully easy to lose track of exactly how much you’ve already dosed.
For dosing order and target ranges, Sprout-lab’s guide on mixing hydroponic nutrients walks through the sequence step by step.
Most growers don’t need to abandon tap water. They need to treat it correctly. A basic carbon filter pitcher removes chloramine and takes the edge off chlorine sensitivity for finicky plants, a fix The Spruce points to as a practical middle ground between full purification and untreated tap.
Never use water that’s passed through a salt-based ion-exchange softener. Those systems trade calcium and magnesium for sodium, and that sodium accumulates in your growing medium over time, eventually stressing roots. If your home has a softener, find an unsoftened tap (an outdoor spigot, a bypass valve) or switch to filtered or distilled water entirely. If you’re stuck with borderline tap water, alternating it with distilled every few waterings limits mineral buildup without committing you to full purification. Sprout-lab’s water quality guide for urban homes covers additive-specific fixes if you’re troubleshooting a particular municipal supply.
Topping off a hydroponic reservoir with plain tap water sounds harmless. Research on nutrient solution recycling found that topping off with alkaline tap water increased EC and let sodium and chloride accumulate, cutting shoot fresh weight by 22 to 36 percent in one experiment. Replacing the solution after about two weeks reversed most of that damage.
Separate research on leafy greens in NFT systems found that topping off with RO or tap water changed how fast potassium and other macronutrients depleted, with potassium dropping to zero in some tanks within a few weeks depending on the topping-off source, a finding from Texas A&M AgriLife Extension. Diluted top-offs (mixing fresh nutrient at roughly a third to half strength) tend to hold steadier than full-strength refills. Watch for white crust forming on net cups, slimy roots, or an EC reading that keeps climbing rather than sitting flat. Those three signs matter more than any single EC number, because they tell you the trend, not just the snapshot.
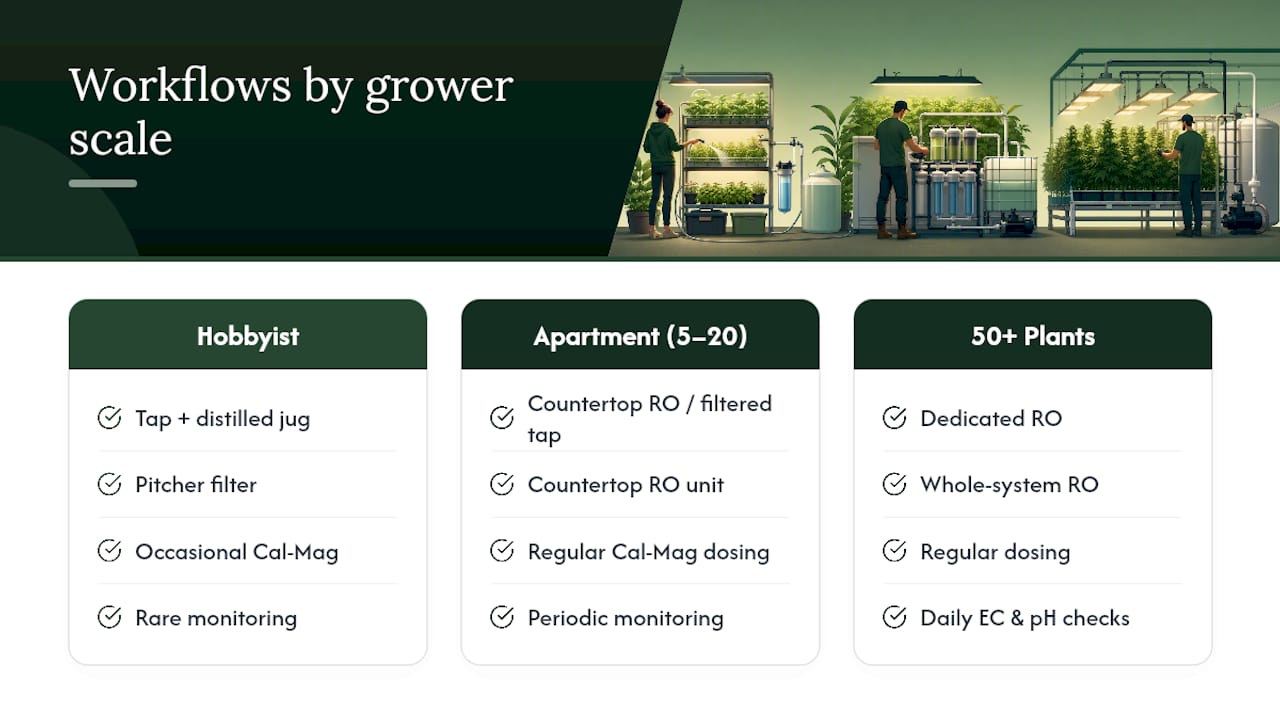
A single-pot hobbyist can rotate a pitcher filter with the occasional distilled jug and call it done, spending maybe a few dollars a month. An apartment grower running 5 to 20 plants usually does better with a countertop RO unit or filtered tap plus regular Cal‑Mag dosing, since the equipment pays for itself once you’re filling more than a couple gallons a week. Growers running 50 or more plants typically need dedicated RO and daily monitoring; at that scale, the labor of checking EC and pH matters more than the water cost itself. Reusing jugs and keeping a pump dispenser near your grow area cuts the daily hassle down to under a minute.
The obsession with finding the “perfect” water misses the actual lesson from the research: consistency beats purity. A grower who uses moderately hard tap water every single week, tests it occasionally, and replaces the reservoir on schedule will usually out-grow someone chasing zero-TDS perfection but skipping Cal‑Mag or letting pH drift unchecked for days.
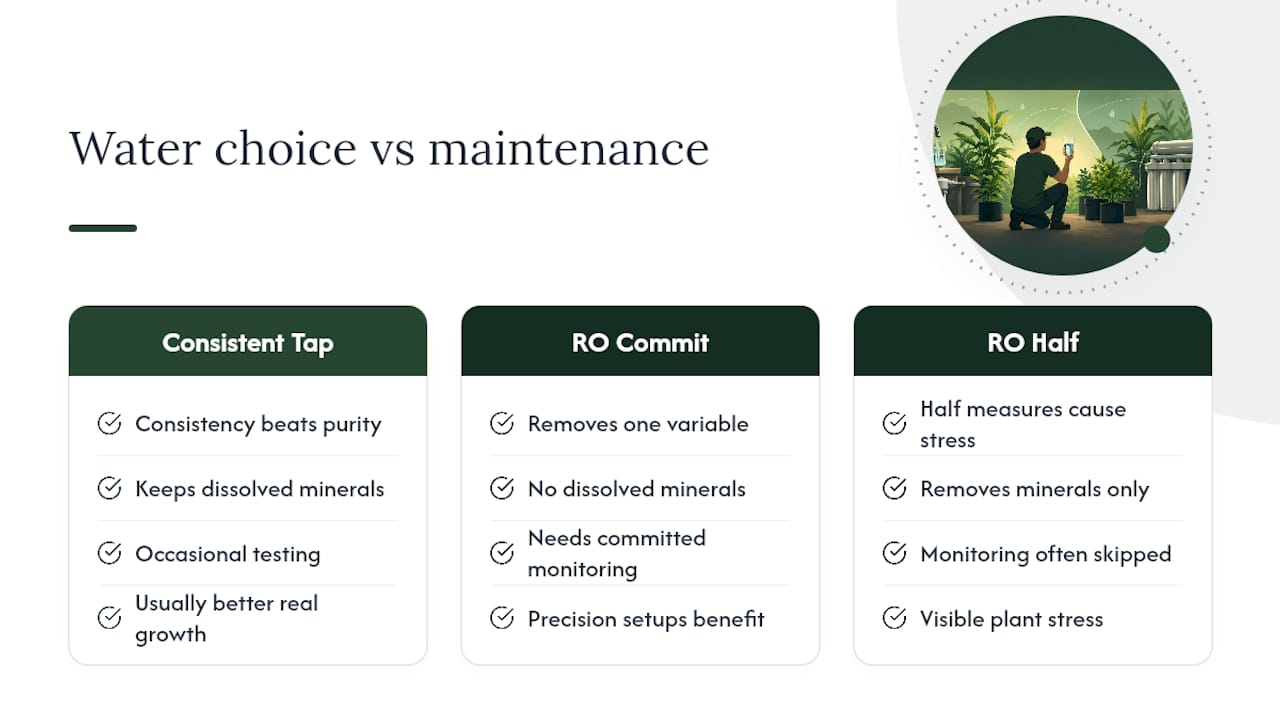
What surprises people is how forgiving most hardy plants actually are. The Frontiers research on nutrient recycling didn’t find that tap water ruins plants. It found that unmanaged accumulation over weeks does the damage. That’s a maintenance problem, not a water-source problem. Distilled and RO water earn their reputation in precision setups because they remove one variable, not because tap water is inherently hostile to root health.
If you’re going to lean into distilled or RO, commit to the monitoring that comes with it. Half-measures, like switching to RO but skipping Cal‑Mag, cause more visible plant stress than sticking with untreated tap water ever would.
— Luna
Hydroponic systems can make nutrient and water management more predictable instead of a daily guessing game, letting you grow many plants in a compact footprint without babysitting a dozen containers.

The modular design keeps reservoirs sized for real apartment use, so top-offs and full changes stay manageable even if you’re new to testing EC or dosing Cal‑Mag. If you’re ready to stop troubleshooting your tap water one plant at a time, check out Sprout-lab’s automated hydroponic setups for urban growers and see which configuration fits your space.
Not universally. Distilled water gives precise nutrient control for hydroponics, but tap water works fine for most hardy houseplants when TDS stays under roughly 200 ppm.
Yes, if you test it first and it’s not run through a salt-based softener; higher TDS or chloramine levels may push you toward filtered or RO water instead.
Above roughly 300 ppm TDS, most growers see better results switching to RO, distilled, or a diluted blend rather than fighting the mineral load directly.
Yes. Distilled and RO water start at zero EC with no calcium or magnesium, so skipping Cal‑Mag typically causes deficiency symptoms within days.
Roughly every one to two weeks, depending on system size and water source, since topped-off solutions accumulate sodium, chloride, and rising EC over time.