Free shipping for order over $50

Free shipping for order over $50
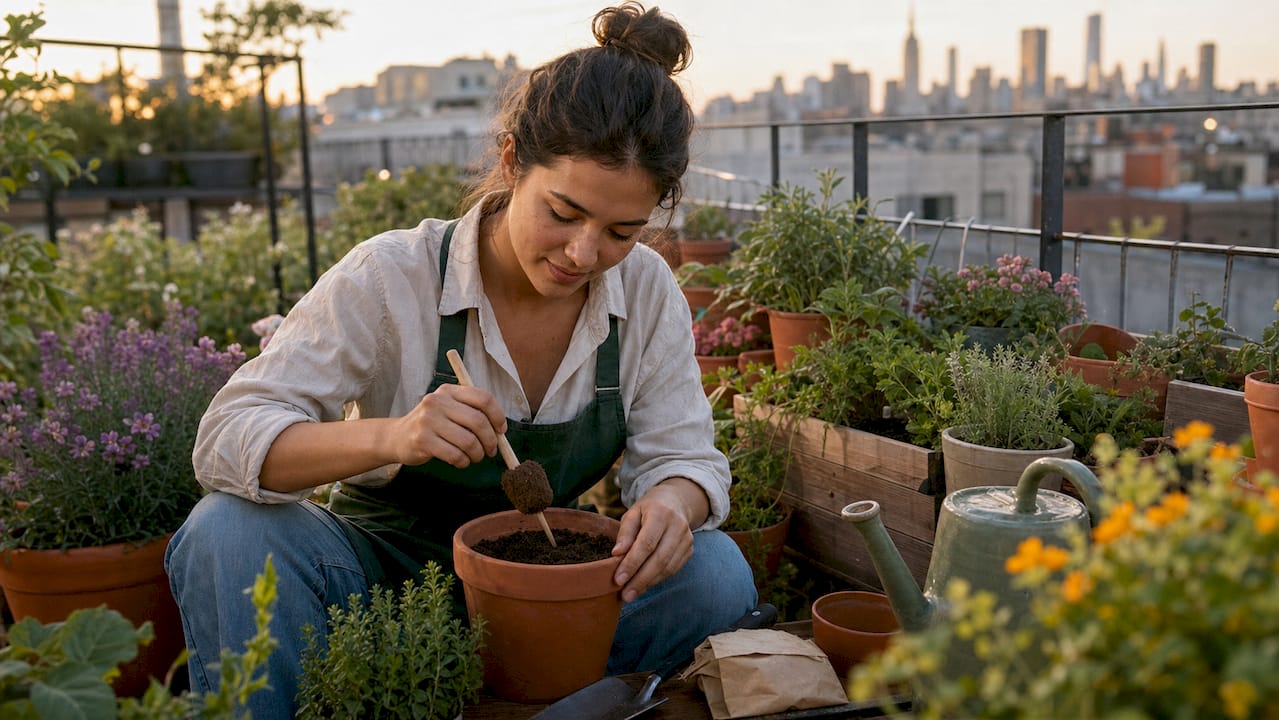
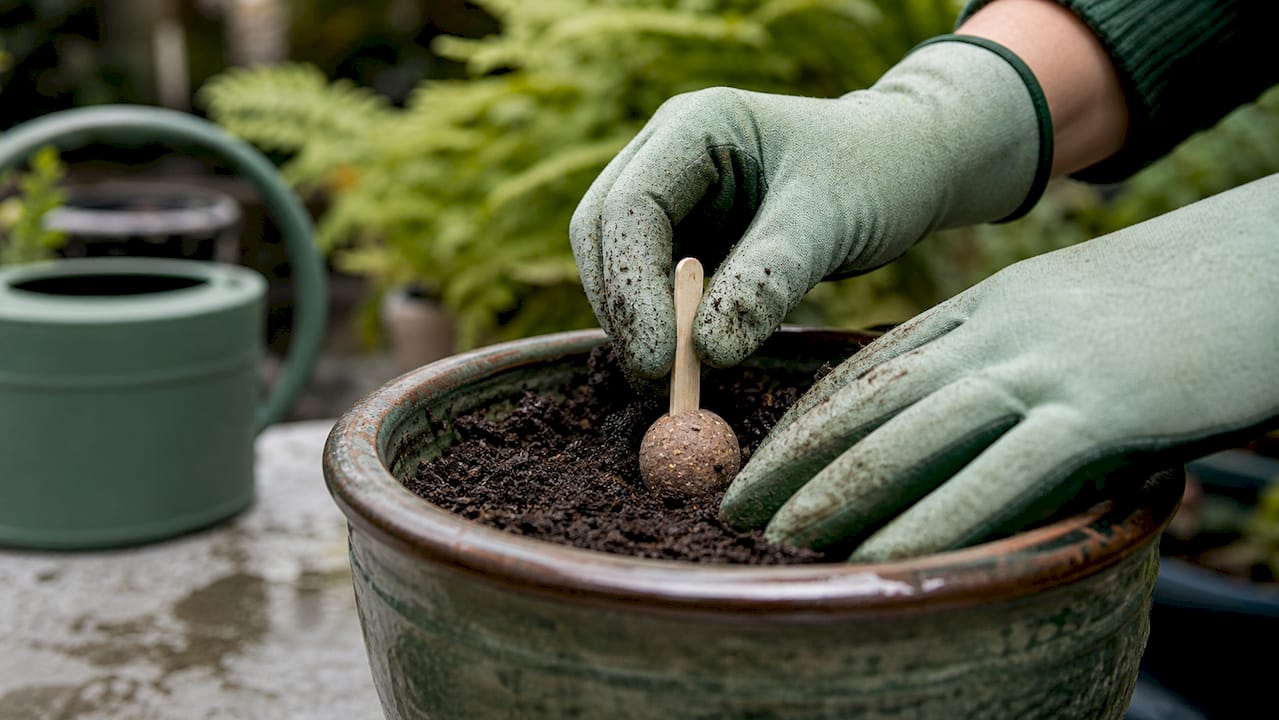
Garden pops are seeds embedded in nutrient-rich clay on a wooden stick, combining seed starting and garden marking in a single compact unit. Products like Garden Seed Pops include edible varieties such as strawberry, sweet basil, and carrot, all packed into a clay matrix made from compost, coconut husk, and non-GMO seeds. For urban gardeners working with a balcony, windowsill, or countertop, they remove the guesswork from seed starting entirely. You push the pop into soil, water consistently, and the clay does the rest.
Garden pops function by surrounding seeds in a moisture-retaining clay matrix that keeps the seed in direct contact with nutrients from the moment it hits soil. That seed-to-soil contact is the real advantage. Most seed-starting failures happen because seeds dry out or shift position before germination begins.
Planting is straightforward. Follow these steps for the best results:
Pro Tip: Press your thumb into the clay before planting. The texture should feel like firm peanut butter. If it crumbles, add a few drops of water. If it sticks to everything, let it dry for ten minutes before planting.
The wooden stick serves a second purpose beyond marking. It gives you a handle for repositioning the pop without disturbing the seed or breaking the clay. That matters when you are managing a dozen pops on a small patio shelf.
Not all compact seed-starting formats work the same way. Choosing the right one depends on your space, skill level, and goals.
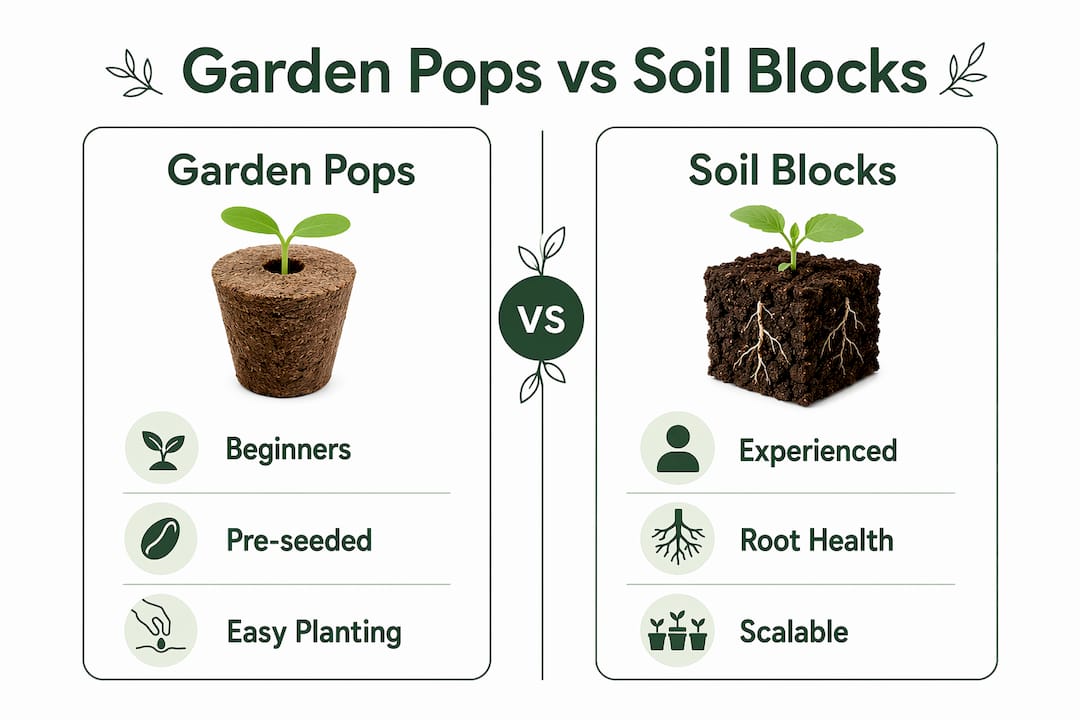
Soil blocks compress moistened soil into firm cubes that hold moisture and allow transplanting with minimal root shock. They reduce plastic use and produce compact, healthy root systems. The downside is that making them requires a soil blocker tool and some practice getting the moisture level right.
Garden pops skip that learning curve. They arrive pre-formed, pre-seeded, and ready to plant. They also double as gifts and party favors in a way that a tray of soil blocks never will.
Here is how the main formats compare:
| Format | Best For | Key Advantage | Main Limitation |
|---|---|---|---|
| Garden Pops | Beginners, gifting, urban balconies | Pre-seeded, no tools needed | Limited seed variety options |
| Soil Blocks | Experienced growers, volume planting | Root health, plastic-free | Requires blocker tool and practice |
| Seed Balls | Outdoor broadcast planting | Easy scatter planting | Less control over placement |
| LECA (clay pebbles) | Hydroponic systems | Reusable, excellent drainage | No seed-starting function |
Seed balls, like those covered in the urban gardener’s guide, work well for scattering across outdoor patches but offer less precision than garden pops. LECA is a hydroponic medium, not a seed-starting format, but it pairs well with garden pop seedlings once they are established.
The clearest takeaway: garden pops win on accessibility and presentation. Soil blocks win on root health and scalability. Pick based on your current setup and goals.
Making homemade seed pops gives you full control over seed selection and clay composition. The process is simpler than it looks.
Basic seed pop recipe:
Beyond seed pops, urban food enthusiasts can extend the garden pop concept into the kitchen with edible flower lollipops. These are a genuine crowd-pleaser at garden parties and farmers market tables.
Edible flower lollipop method:
Combine sugar, corn syrup, and water in a saucepan. Cook the mixture until it reaches the hard-crack stage at approximately 302°F. That temperature is non-negotiable for proper texture. Remove from heat, add flavoring, and pour into lollipop molds. Press edible flowers like violets, pansies, or borage blooms into the surface before the candy sets.
Pro Tip: Use a candy thermometer and clip it to the side of the pan before you start heating. Pulling the candy off heat even 5°F too early produces a sticky, soft lollipop instead of a crisp one. Exact temperature control is the difference between a showstopper and a mess.
For frozen garden popsicles, blend fresh herbs and fruits directly from your garden. Strawberry and basil is a classic combination. Cucumber and mint works well for hot days. Pour into popsicle molds, freeze for at least four hours, and you have homemade frozen treats that taste like your garden in a single bite.
Garden pops convert seed starting into small, manageable units that require minimal space and tools. That quality makes them unusually versatile for urban lifestyles.
Practical applications worth trying:
The best plants for garden pops in small spaces include:
Each of these grows well in containers, germinates reliably in clay-based media, and produces something you can actually eat or use in the kitchen. That last point matters. Growing food you use daily makes the habit stick.
Nutritionally, herbs like basil and chives deliver meaningful amounts of vitamins K and C even in small harvests. Pairing fresh garden produce with homemade frozen popsicles turns a gardening hobby into a full sensory experience, from planting to eating.
Garden pops are the most accessible seed-starting format for urban growers because they combine moisture retention, seed placement, and plant marking in one ready-to-use unit.
| Point | Details |
|---|---|
| Moisture is the top success factor | Keep clay consistently damp after planting; drying out kills germination faster than any other mistake. |
| Soil texture determines results | Homemade pops need a sticky-but-not-wet clay mix for reliable seed-to-soil contact. |
| Format choice depends on your goals | Garden pops suit beginners and gifting; soil blocks suit volume growers focused on root health. |
| Edible treats extend the concept | Frozen garden popsicles and flower lollipops turn your harvest into shareable, kitchen-ready experiences. |
| Urban integration is straightforward | Garden pops pair with hydroponics, tabletop systems, and indoor setups for year-round growing. |
I spent two seasons overcomplicating seed starting. I had trays, heat mats, grow lights, and a spreadsheet tracking germination rates by variety. The results were fine. The process was exhausting.
The first time I tried garden pops, I pushed three of them into a windowsill pot, watered once, and forgot about them for four days. All three germinated. That experience forced me to reconsider what seed starting actually requires. Consistent moisture and good seed-to-soil contact cover most of the work. Everything else is theater.
What I have found is that the wooden stick marker solves a problem most gardeners do not realize they have. Unlabeled seedlings all look identical for the first two weeks. Garden pops eliminate that confusion from day one.
My one caution: do not skip the moisture check before planting homemade pops. A clay mix that is too dry will crack and separate from the seed before germination begins. I lost an entire batch of carrot pops that way. The feel test matters more than any recipe ratio.
For anyone pairing garden pops with a hydroponic system, I recommend starting the pops in soil first and transferring seedlings once the root system is visible. Dropping a fresh pop directly into a water-based system before roots form rarely ends well.
— Luna
If garden pops sparked your interest in small-space growing, Sprout-lab builds the systems that take you from a single pop to a full productive garden. Their modular hydroponic setups let you grow up to 56 plants in a compact area, with no prior experience needed. Over 25,000 completed orders carry a 4.9/5 star rating, and customers consistently report faster germination and stronger plant health.
Start with their passive hydroponic setup guide to see how easily a balcony or countertop becomes a productive edible garden. For soil-based growing, their nutrient-rich soil mixes are formulated specifically for seed starting and container plants, making them a natural companion to any garden pop project.
Garden pops are seeds embedded in a nutrient-rich clay matrix attached to a wooden stick. The clay holds moisture and nutrients while the stick acts as a planting guide and plant marker.
Germination time varies by plant, but seed-bearing pops planted in organic soil can produce established edible plants in roughly three months with consistent watering and monthly fertilizing.
Yes. Combine compost, clay soil, and coconut coir in equal parts, press seeds into the center, shape around a wooden stick, and let dry for 24 hours before planting. The clay texture should feel sticky but not wet for best results.
Garden pops are pre-formed, pre-seeded clay units ready to plant with no tools. Soil blocks are compressed soil cubes you make yourself using a blocker tool, offering better root development but requiring more preparation.
Yes, when made with food-safe edible flowers like violets, pansies, or borage and cooked candy that reaches 302°F. Always confirm that your flowers are pesticide-free and identified correctly before using them in food.