Free shipping for order over $50

Free shipping for order over $50
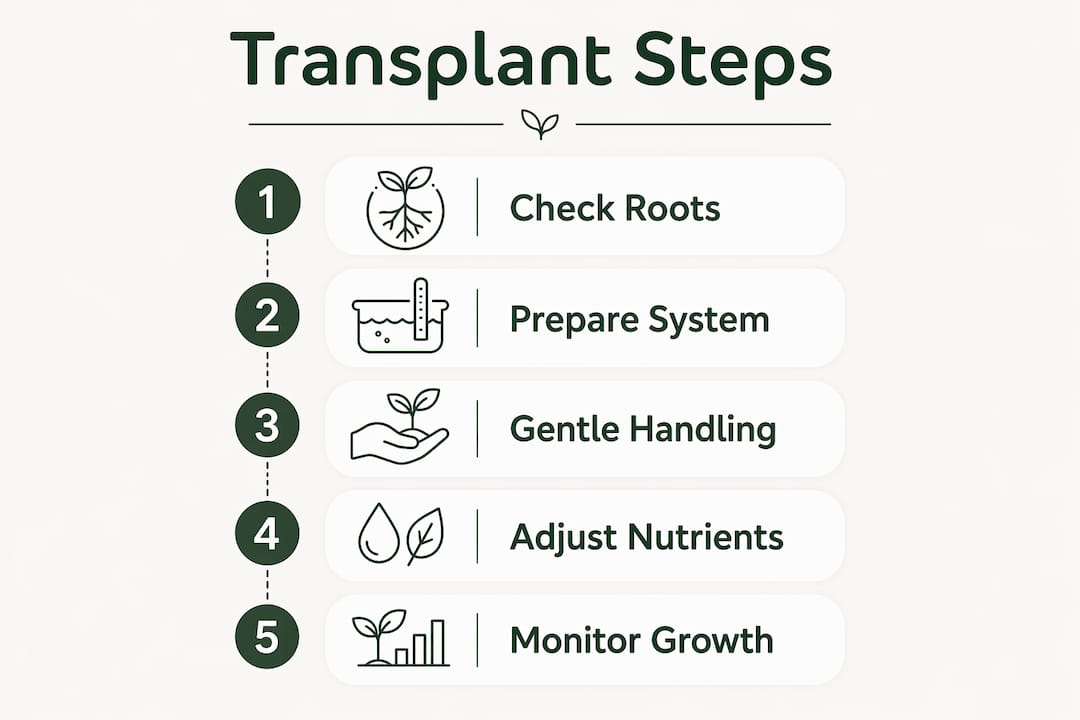
Transplanting seedlings into a hydroponic system is defined as moving young plants from starter plugs, rockwool cubes, or soil into a water-based growing setup where roots access nutrients directly. Done correctly, this move accelerates growth and eliminates the soil-borne disease risks that slow down traditional gardens. Done wrong, it triggers transplant shock, a stress response that stunts roots and can kill seedlings within days. The keys to success are timing, environment preparation, and gentle handling. Tools like net pots, rockwool cubes, clay pebbles, and a calibrated nutrient solution are the core materials you need before you move a single plant.
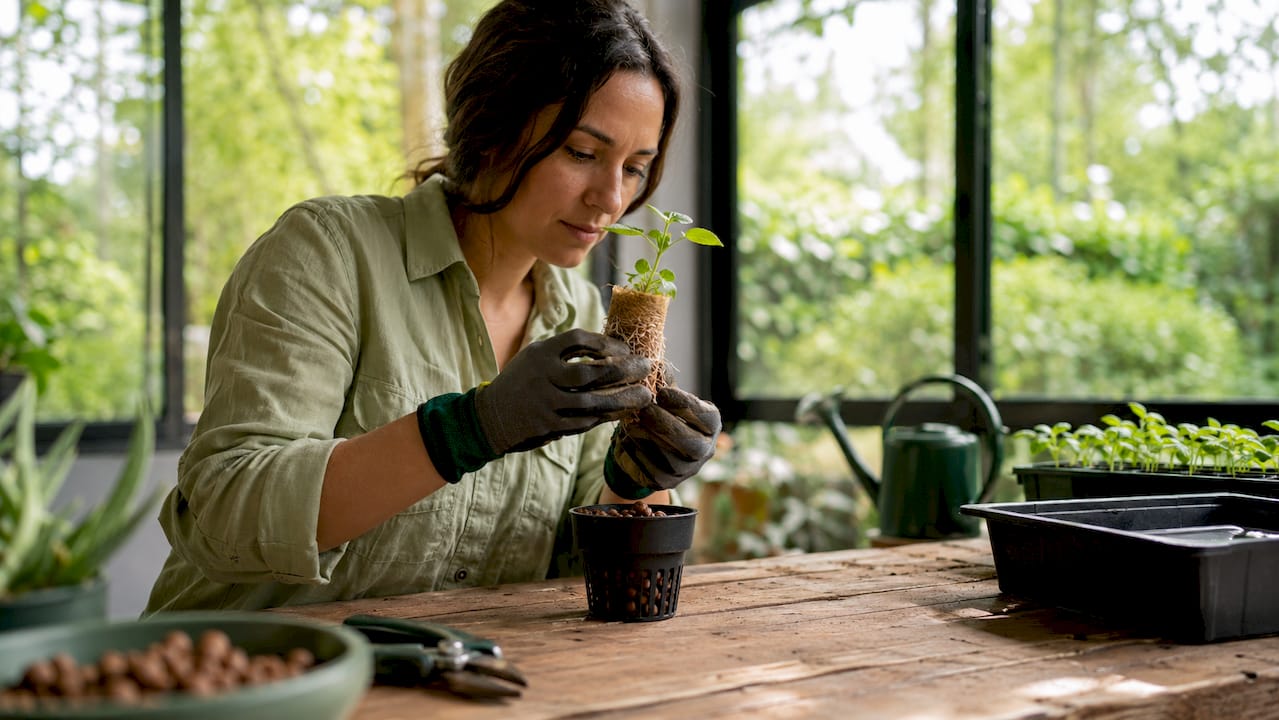
The single most reliable signal that a seedling is ready to move is white roots protruding 1–2 inches from the base of the growing plug. Roots that have not yet reached the plug’s bottom are still drawing moisture from the starter medium. Moving them too early forces the plant to search for water it cannot find, causing stress within 24–48 hours.
The second indicator is leaf development. A seedling needs at least two to three sets of true leaves before transplanting. True leaves are the second and subsequent pairs that appear after the initial seed leaves. They signal that the plant’s photosynthesis system is functional and strong enough to handle the stress of relocation.
For common herbs and leafy greens, here are general timing windows from seed to transplant readiness:
These windows assume consistent warmth and light. Cooler rooms or low light will push those timelines out by several days.
Pro Tip: Check root development from underneath the plug, not from the top. A seedling can look lush above the medium while roots are still too short to support a successful transplant.
Rockwool plugs are the preferred starter medium for hydroponic growers because they let you see root emergence clearly. Net pots with moisture-retaining plugs also allow root air-pruning, which primes roots for the transition into the main system without disturbing the root ball.
Think of system preparation the way you would set up a nursery before bringing a newborn home. Every condition needs to be right before the seedling arrives, not after. Calibrating your environment in advance is the single biggest factor separating successful transplants from failed ones.
The target environmental parameters are:
Seedlings germinate best between 68–77°F, and that same warmth supports root establishment after the move. A pH outside the 5.5–6.5 window locks out key nutrients even when the solution is correctly mixed. Always test and adjust pH before the seedlings go in.
| Parameter | Target Range | Why It Matters |
|---|---|---|
| Temperature | 65–75°F | Supports root enzyme activity |
| Humidity | 40–60% | Reduces leaf stress and wilting |
| Light distance | 12–14 inches | Prevents leaf burn on tender growth |
| pH | 5.5–6.5 | Unlocks full nutrient availability |
| Nutrient strength | ~25% at start | Protects fragile roots from burn |
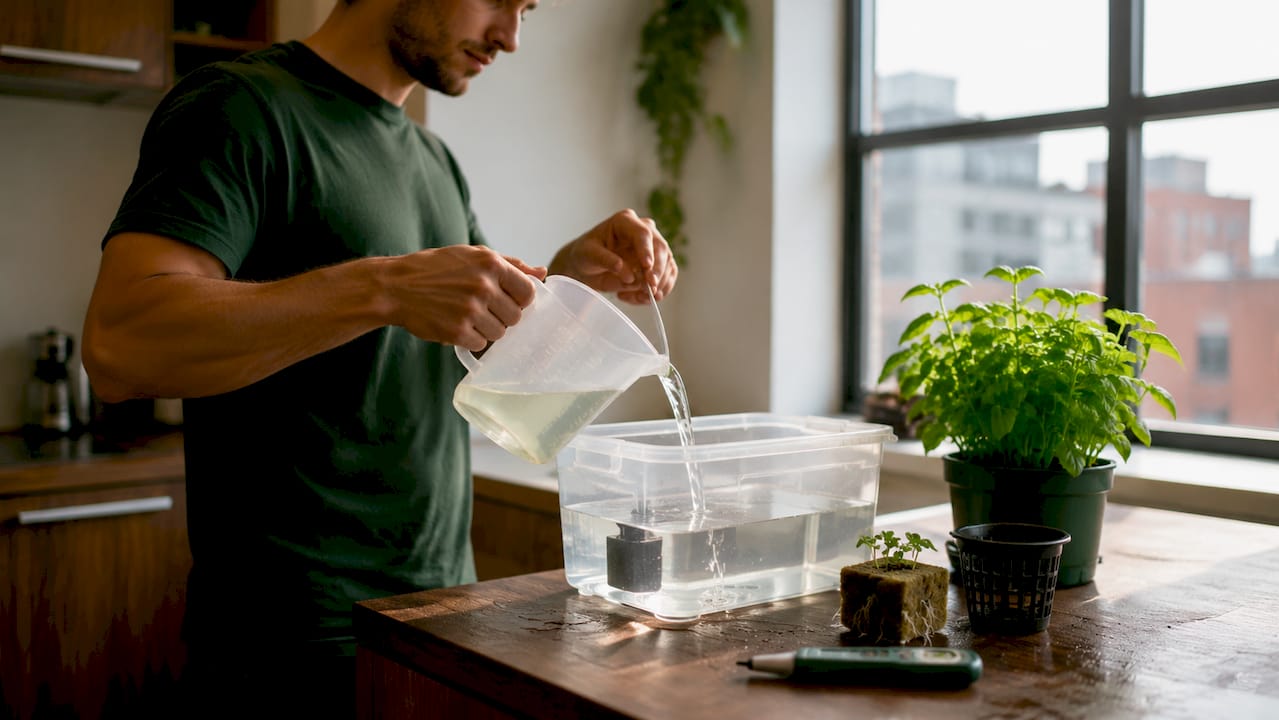
Pro Tip: Mix your nutrient solution at least two hours before transplanting. This gives the pH time to stabilize and lets you make final adjustments without rushing.
Net pot size matters too. A 2-inch net pot suits most seedlings at transplant time. Larger 3-inch pots work for tomatoes or peppers that will grow into bigger plants. Pair net pots with clay pebbles or rockwool as the growing medium. Both hold moisture without waterlogging roots, which is critical in the first week. You can read more about managing pH levels to keep your system dialed in from day one.
Follow these steps in order. Skipping or rushing any stage increases the risk of root damage and transplant shock.
Pro Tip: Label each net pot with the plant variety and transplant date. Tracking this data across a few grows will show you exactly which timing and spacing combinations produce the best results in your specific setup.
The most common mistakes are planting too deep, using full-strength nutrient solution on day one, and skipping the pH check. Each one is easy to avoid with a checklist approach.
| Mistake | Consequence | Fix |
|---|---|---|
| Planting too deep | Stem rot, suffocated roots | Stem base at or just above pot rim |
| Full-strength nutrients | Root burn within 48 hours | Start at 25% strength |
| Wrong pH | Nutrient lockout | Test and adjust to 5.5–6.5 before transplant |
| Overcrowding | Disease, stunted growth | Follow spacing guidelines per variety |
Post-transplant care in the first seven days determines whether your seedlings thrive or stall. The most visible sign of transplant shock is wilting despite adequate water. This happens because damaged roots cannot absorb moisture efficiently yet. It usually resolves within 48–72 hours if conditions are correct.
Adjust your nutrient solution progressively. Start at 25% strength on transplant day, move to 50% by day three, and reach full strength by day seven. Fragile roots burn when exposed to full-strength solution immediately after transplant. Gradual increases let roots acclimate without stress.
Watch your growing medium moisture carefully. The medium should feel like a wrung-out sponge: damp but not dripping. Overwatering leads to damping off, a fungal disease that collapses seedling stems at the base. Once damping off sets in, the seedling cannot be saved. Prevention is the only strategy.
Air circulation is non-negotiable. A small fan running on low keeps air moving across the canopy, which dries surface moisture and prevents powdery mildew. Keep the fan positioned so it creates gentle leaf movement, not violent shaking. LED grow lights placed too close damage tender leaves in early stages, so start at 12–14 inches and lower gradually as plants mature. For a deeper look at feeding schedules, the Sprout-lab guide on hydroponic fertilizer practices covers dilution timing in detail.
Spacing is not just about fitting more plants into a tray. It directly controls airflow, light penetration, and disease risk across your entire system. Crowded plants share stale air, which creates the warm, humid pockets where powdery mildew and tip burn thrive.
Recommended spacing by variety:
Proper spacing maximizes yield per square foot by preventing canopy overlap and disease spread. This is especially relevant for urban growers working with compact systems where every inch counts.
| Growth Stage | Recommended Action |
|---|---|
| Seedling (0–7 days post-transplant) | Use starter spacing; leave room to expand |
| Juvenile (7–21 days) | Thin or reposition if crowding appears |
| Mature canopy | Maintain full recommended spacing per variety |
For reservoir lid systems or NFT channels, mark hole spacing before drilling. Fixing a spacing error after the system is built costs time and materials. Sprout-lab’s modular systems are designed with correct hole spacing built in, which removes this variable entirely for home growers. You can explore plants suited to hydroponic setups to plan your layout before you build.
Successful hydroponic transplanting requires visible root development, a pre-calibrated environment, gentle handling, and progressive nutrient increases to protect fragile roots and sustain healthy growth.
| Point | Details |
|---|---|
| Wait for root readiness | Transplant only when white roots protrude 1–2 inches from the plug base. |
| Calibrate before transplanting | Set temperature, humidity, pH, and light before seedlings enter the system. |
| Use the no-touch method | Transfer rockwool plugs whole to avoid root damage and reduce shock. |
| Start nutrients at 25% strength | Gradually increase to full strength over seven days to prevent root burn. |
| Follow spacing guidelines | Use 8–10 inches for lettuce varieties to prevent disease and maximize yield. |
Most transplant failures I see come down to one thing: impatience. Growers check their seedlings on day five, see green leaves, and move them before roots have reached the plug base. The plant looks fine for 24 hours. Then it collapses.
The no-touch method using rockwool plugs changed how I approach this entirely. You never handle the roots at all. The plug goes straight into the net pot, clay pebbles fill the gaps, and the root system continues growing without interruption. I have seen seedlings that would have died from root handling thrive completely with this approach.
The other lesson I keep coming back to is nutrient discipline. Starting at 25% strength feels counterintuitive. You want your plants fed. But roots that just moved are not ready to absorb a full nutrient load. Giving them time to establish before ramping up concentration is the difference between a plant that takes off and one that stalls for two weeks.
My honest advice: treat your first transplant as a learning run. Take notes on timing, spacing, and how your specific system responds. The guidelines here are solid starting points, but your grow space has its own variables. The growers who get consistent harvests are the ones who track what they do and adjust based on what they see.
— Luna
Urban growers who want consistent results without constant troubleshooting need a system built for that goal. Sprout-lab designs home hydroponic systems specifically for busy people who want real food from compact spaces. The modular setup supports up to 56 plants in a small footprint, with correct hole spacing and nutrient management built into the design.
Sprout-lab has completed over 25,000 orders with a 4.9/5 star rating, and customers consistently report faster germination and stronger plant health compared to soil growing. If you are setting up your first system or upgrading an existing one, the passive hydroponic setup guide walks you through every stage from seed to harvest with minimal effort required.
Seedlings are ready when white roots protrude 1–2 inches from the base of the starter plug and the plant has at least two to three sets of true leaves. Transplanting before roots reach this stage causes water stress and rapid decline.
Start at approximately 25% of full nutrient solution strength on transplant day. Increase gradually over seven days to avoid burning the fragile root system.
Butterhead and bibb lettuce need 8 inches center-to-center. Romaine and iceberg require 10 inches. Loose-leaf varieties can be placed as close as 6 inches apart.
Transplant shock results from root damage during handling, incorrect pH, full-strength nutrients applied too early, or moving seedlings before roots are fully developed. Using rockwool plugs and the no-touch transfer method reduces shock significantly.
Keep the growing medium moist but not saturated, maintain airflow with a low-speed fan, and avoid water pooling at the base of seedlings. Damping off is a fungal disease triggered by overwatering and stagnant air conditions.