Free shipping for order over $50

Free shipping for order over $50
Growing food indoors gives you fresh, nutritious produce year-round regardless of season, outdoor space, or climate. That’s the short answer. The longer one involves a few real trade-offs worth knowing before you buy a single seed packet.
The core benefits come down to three things: freshness (harvested minutes before eating, not days), control (you decide what goes on your plants), and resilience (no frost, no drought, no missed growing season). The main trade-off is light. Indoors, you either have a genuinely bright south-facing window or you’re running LED grow lights, which add to your electricity bill.
Here’s what the evidence actually supports:
University of Illinois Extension recommends clarifying your goal before buying anything. Culinary herbs for flavor require a very different setup than growing enough greens to meaningfully supplement your diet. That single question shapes everything else.
Growing food indoors delivers fresh, nutritious produce year-round in any apartment or urban space, with light being the primary factor that determines which crops and methods will work for your setup.
| Point | Details |
|---|---|
| Light determines everything | Leafy crops need 4–6 hours; fruiting crops need 6–8+ hours and usually require a dedicated LED panel. |
| Start with fast crops | Microgreens (7–14 days), herbs, and salad greens give the fastest returns and the lowest failure rate for beginners. |
| Three cost tiers | Windowsill setup costs $10–$40; shelf + LED runs $80–$200; compact hydroponic systems start at $150–$400+. |
| Health evidence is real but specific | One randomized study linked microbially rich indoor growing to immune-regulating changes and greater skin microbiota complexity. |
| Sprout-lab for compact setups | Sprout-lab’s modular hydroponic systems support up to 56 plants in a small footprint, with integrated lighting and low daily maintenance. |
The case for growing vegetables indoors isn’t just about convenience. Several of the advantages are genuinely hard to replicate any other way.
Freshness and flavor that grocery stores can’t match. Lettuce harvested and eaten within the hour tastes different from lettuce that spent five days in a refrigerated truck. Basil picked at the moment of use has volatile oils intact that start degrading within hours of cutting. Growing at home doesn’t just save money on herbs; it changes the quality of what you’re eating.
Nutritional control. You choose the growing medium, the nutrients, and whether to use pesticides. For families with young children or anyone managing specific dietary needs, that control matters. Hydroponic systems let you dial in nutrient solutions precisely, which is harder to do in outdoor soil.
Year-round production. Outdoor gardening is seasonal. Indoor growing isn’t. With the right light, you can harvest salad greens in January and basil in February. A 2026 review published in Frontiers in Sustainable Food Systems concluded that controlled-environment agriculture offers promising approaches to improve urban nutritional security precisely because of this year-round, precision-managed production capacity.
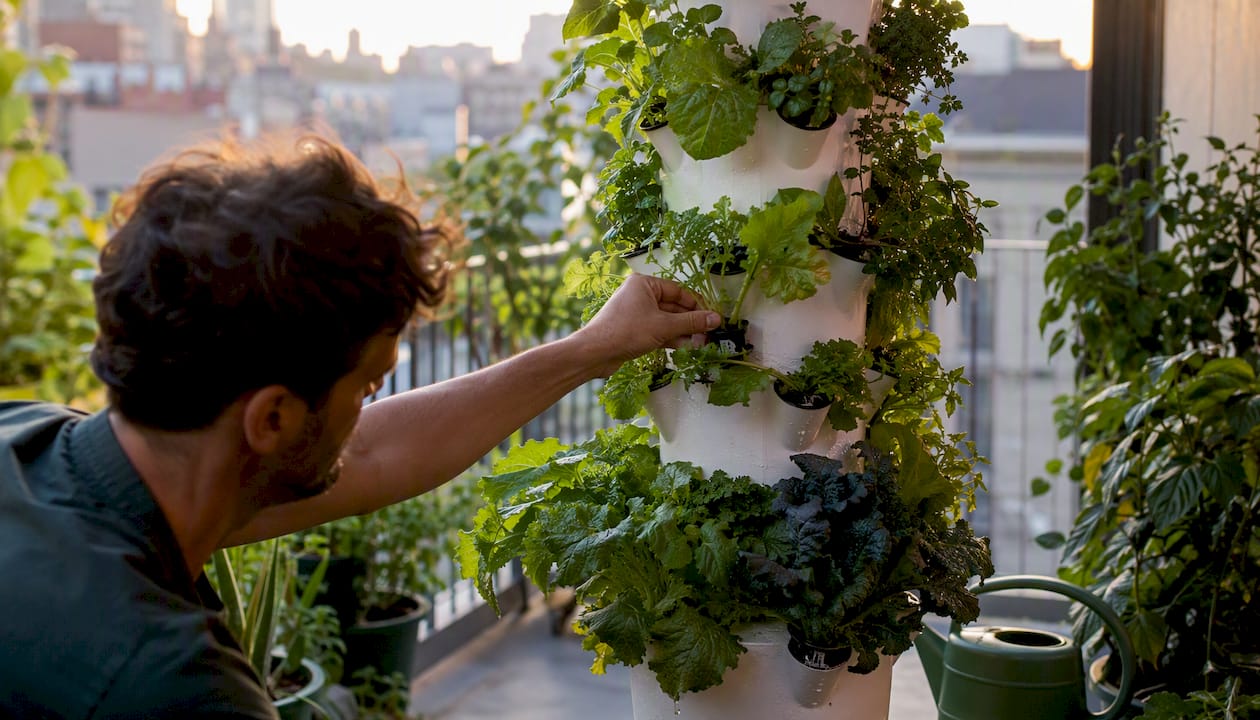
Space efficiency. A vertical hydroponic tower can grow up to 56 plants in a footprint that fits on an apartment balcony or in a corner of a living room. Soil containers work too, but they use horizontal space less efficiently. For urban apartment dwellers, vertical systems are often the only practical path to meaningful food production.
Mental health and stress reduction. Multiple studies summarized by Healthline link indoor gardening tasks to reduced stress, improved mood, and better attention. The effect is consistent enough across studies to take seriously, even if the mechanisms aren’t fully understood.
Reduced food miles. Food grown in your kitchen travels zero miles. That’s not a trivial point for urban households thinking about their environmental footprint.
Resilience for urban households. Supply chain disruptions, price spikes, and seasonal shortages hit grocery stores unpredictably. A small indoor setup producing herbs and greens continuously provides a meaningful buffer. The grow-your-own movement has accelerated in dense urban areas partly for this reason.
Pro Tip: Microgreens deliver the fastest nutritional return per square foot of any crop. A single tray of sunflower or pea microgreens can be ready to eat in 7–14 days and requires no grow light if you have a bright window.
Not every crop belongs indoors. The ones that thrive share a few traits: compact growth habit, tolerance for lower light levels, and a fast enough cycle to stay motivating.
Best starter crops for beginners:
These crops work because they don’t need pollinators, they tolerate modest light, and they produce quickly enough to keep you engaged.
Compact fruiting and root options (with the right setup):
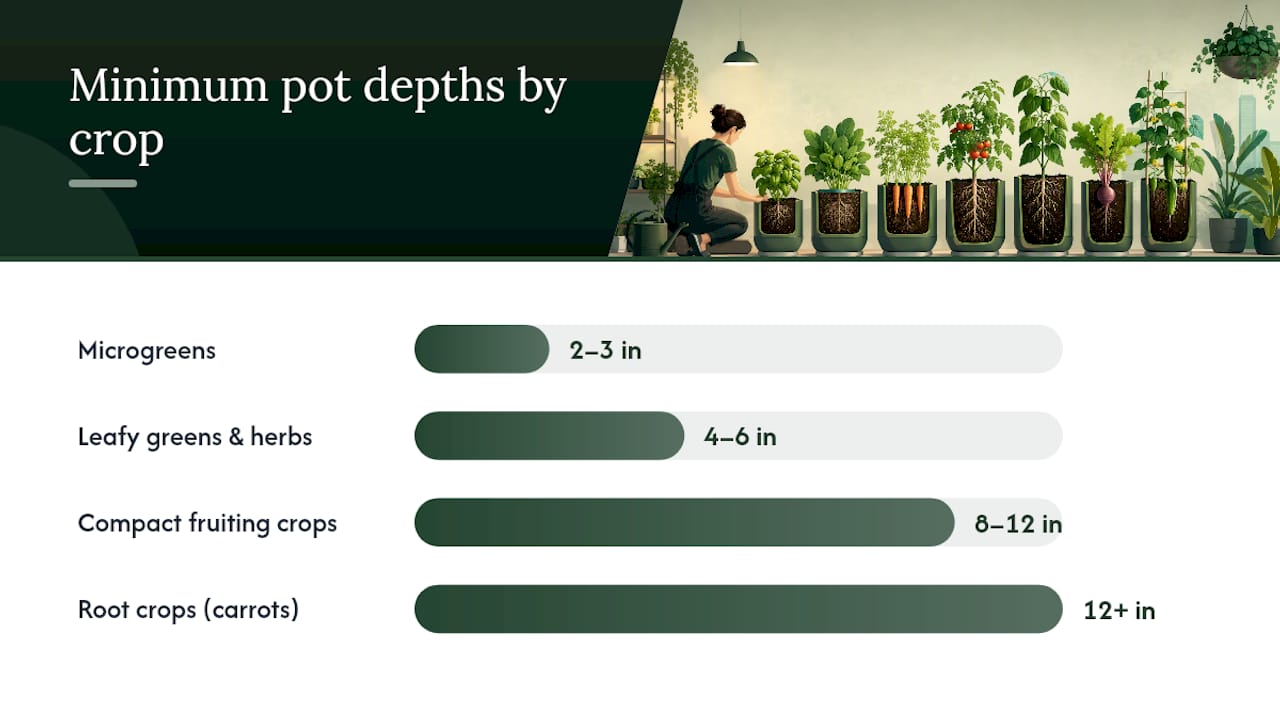
Almanac notes that fruiting and root crops generally need more light and larger containers, and recommends compact cultivars specifically bred for indoor or container growing. Dwarf tomato varieties (‘Tiny Tim’, ‘Tumbling Tom’), compact peppers (‘Lunchbox’, ‘Pot-a-Peno’), and carrots in deep pots (at least 12 inches) can all succeed indoors, but they need 6–8+ hours of strong light and dedicated LED grow lights in most apartments. Hand-pollination by gently shaking the plant or using a small brush is also necessary indoors, since there are no bees.
What to avoid as a beginner:
Full-size vining crops (cucumbers, squash, full-size tomatoes) need space, strong light, and consistent pollination management that makes them frustrating for a first setup. Large root crops like parsnips or full-size beets need very deep containers and produce slowly. Save these for when you have a working system and a feel for your light levels.
| Crop type | Light hours needed | Minimum pot depth |
|---|---|---|
| Microgreens | 4–6 hrs (window OK) | 2–3 inches (tray) |
| Leafy greens / herbs | 4–6 hrs | 4–6 inches |
| Compact fruiting crops | 6–8+ hrs (LED recommended) | 8–12 inches |
| Root crops (carrots) | 6–8 hrs | 12+ inches |
Setting realistic expectations here prevents the most common form of indoor gardening disappointment: spending $200 on equipment and harvesting three basil leaves.
Three cost bands:
Windowsill setup ($10–$40): A few 4-inch pots, a bag of potting mix, and seed packets. Works for herbs and microgreens if you have a genuinely bright south-facing window. No electricity cost beyond what you already use. Time to first harvest: 7–21 days for microgreens and herbs.
Mid-range shelf with LED grow light ($80–$200): A small wire shelf, a full-spectrum LED panel (typically 20–45W for a single shelf), pots or a small tray system, and a timer. This setup reliably grows salad greens, herbs, and microgreens year-round regardless of window quality. Time to first harvest: 14–30 days for greens. Monthly yield from a single 2-foot shelf: roughly 1–2 pounds of mixed salad greens per harvest cycle.
Compact hydroponic system ($150–$400+): A reservoir-based or tower system with integrated lighting, nutrient solution, and a pump or passive wicking mechanism. Faster growth rates than soil (hydroponics delivers nutrients directly to roots), higher plant density, and lower water use. Time to first harvest: 14–21 days for greens, 60–90 days for compact fruiting crops. A low-touch indoor growing system in this category can run largely on timers with minimal daily attention.
| Setup type | Estimated setup cost | Time to first harvest | Approx. monthly yield (greens) |
|---|---|---|---|
| Windowsill (pots + soil) | $10–$40 | 7–21 days | Small (snipping herbs, 1–2 trays microgreens) |
| Shelf + LED grow light | $80–$200 | 14–30 days | 1–2 lbs mixed greens per cycle |
| Compact hydroponic system | $150–$400+ | 14–21 days (greens) | Higher density; 2–4 lbs greens per cycle |
Running costs to factor in:
To keep energy costs down: use a timer (lights on only during the photoperiod your crops need), choose efficient LED panels over fluorescent or incandescent, and don’t run lights longer than necessary. Home garden automation with simple outlet timers costs under $15 and eliminates the most common energy waste.
Success indoors comes down to five factors. Get these right and most crops will perform well. Miss one and you’ll spend weeks troubleshooting.
Light is the single most common limiting factor in indoor food production. A bright south-facing window in summer can work for leafy greens and herbs. In winter, or in apartments with north-facing or obstructed windows, supplemental LED lighting is usually necessary for anything beyond microgreens.
Leafy crops need around 4–6 hours of direct-equivalent light. Fruiting crops typically need 6–8+ hours of strong, full-spectrum light, which almost always means a dedicated LED grow light. The role of grow lights indoors is often underestimated by beginners who assume a bright room is sufficient.
For LEDs: look for full-spectrum panels (covering both blue and red wavelengths), position them 6–18 inches above the canopy depending on the manufacturer’s guidance, and use a timer set to the crop’s photoperiod (typically 12–16 hours for most edibles).
Pro Tip: Hold your hand flat above your plants at canopy height. If you can’t see a sharp shadow, the light is too weak for fruiting crops. Leafy greens are more forgiving, but even they’ll get leggy without enough intensity.
Container drainage is non-negotiable. Pots without drainage holes cause root rot within days. Use a well-draining potting mix (not garden soil, which compacts in containers) or a soilless medium like coco coir mixed with perlite. For hydroponics, the growing medium (rockwool, clay pebbles, or net pots with coco) supports the plant while the nutrient solution does the feeding work.
Watering rule of thumb for soil containers: water when the top inch of medium feels dry. Overwatering kills more indoor plants than underwatering.
Most edible crops grow well between 65°F and 80°F, which covers the range of most home interiors. Keep plants away from heating and air conditioning vents, which cause rapid moisture loss and temperature swings. A small USB fan running on low for a few hours daily strengthens stems and reduces the risk of fungal issues in humid rooms.
Soil potting mixes contain nutrients for roughly 4–6 weeks. After that, plants need supplemental feeding. A balanced, water-soluble fertilizer (look for roughly equal N-P-K ratios for leafy crops, or a higher phosphorus formula for fruiting crops) applied every 1–2 weeks at half the recommended dose is usually sufficient. In hydroponics, a complete nutrient solution replaces soil feeding entirely.
Quick site assessment checklist:
If you answered yes to all five, you have a workable indoor growing site.
The method you choose shapes your daily routine, your startup cost, and what you can realistically grow. Here’s how the main approaches compare for apartment and urban growers.
Soil containers are the most familiar and lowest-cost entry point. They’re forgiving, require no specialized knowledge, and work with any pot that has drainage. The downside: soil is heavy, can harbor pests, and requires more frequent watering than soilless systems.
Passive hydroponics (Kratky method, wick systems) uses no pump or electricity beyond lighting. Plants sit in net pots above a nutrient reservoir and draw solution up through wicks or via air gap. Extremely low maintenance once set up.
Reservoir hydroponics (deep water culture, NFT, flood-and-drain) circulates nutrient solution actively. Faster growth than passive systems, scales well, and suits a wider range of crops.
Aeroponics mists roots with nutrient solution at intervals. The fastest growth rates of any method, but the most technically demanding and expensive to set up correctly.
Windowsill microgreens are their own category: shallow trays, a basic growing medium, seeds, and a bright window. No system required.
| Method | Maintenance level | Estimated setup cost | Space needed | Best for |
|---|---|---|---|---|
| Soil containers | Low-medium | $10–$60 | Windowsill to shelf | Herbs, greens, beginners |
| Passive hydroponics | Low | $20–$80 | Small shelf or counter | Herbs, leafy greens |
| Reservoir hydroponics | Medium | $100–$400 | Shelf or floor unit | Greens, compact fruiting |
| Aeroponics | Medium-high | $150–$400+ | Dedicated unit | High-yield greens, advanced |
| Windowsill microgreens | Very low | $5–$20 | Windowsill tray | Microgreens only |
For growing plants in small urban spaces, passive hydroponics and reservoir systems consistently outperform soil on yield per square foot while using less water overall.
Goal: Fresh culinary herbs on demand (basil, mint, chives, parsley).
What you need:
Setup sequence:
Weekly time commitment: 10–15 minutes. Space footprint: 2 linear feet of windowsill.
This plan works best for flavor and convenience. It won’t replace grocery store produce, but it will mean you always have fresh herbs. University of Illinois Extension makes the point clearly: if your goal is culinary flavor, a windowsill herb setup is the right scale. If you want nutritional yield, you need more.
Goal: Weekly supply of salad greens and herbs year-round.
What you need:
Setup sequence:
Weekly time commitment: 20–30 minutes. Space footprint: 2 square feet per shelf.
This is the setup that actually replaces a meaningful portion of grocery store greens. One 2-foot shelf running two crop cycles per month produces roughly 1–2 pounds of mixed greens per cycle.
Goal: Steady supply of greens, herbs, and eventually compact fruiting crops.
What you need:
Setup sequence:
Weekly time commitment: 20–40 minutes. Space footprint: 1–3 square feet depending on system.
For a detailed walkthrough of compact growing systems and which configuration fits different apartment sizes, Sprout-lab’s guide covers the key decisions clearly. This plan suits anyone who wants reliable, higher-density production without daily fuss.
Pro Tip: Before buying any system, measure your available space and check your ceiling height. Tower systems need clearance above the top plant site for the light fixture. A system that fits perfectly on paper but requires you to remove a shelf to water it will get abandoned.
Leggy, stretched plants are almost always a light problem. When plants reach toward a light source and develop long, weak stems, they’re not getting enough intensity or hours. Move them closer to the light source or add a stronger LED panel. Increasing photoperiod by 2 hours is often enough to correct mild legginess in leafy crops.
Root rot shows up as brown, mushy roots and wilting despite wet soil. The cause is almost always poor drainage or overwatering. Fix it by removing the plant, trimming dead roots, repotting in fresh well-draining medium, and watering only when the top inch is dry. In hydroponics, root rot often signals low oxygen in the reservoir: add an air stone or increase reservoir changes.
Fungus gnats are the most common indoor growing pest. The larvae live in moist soil and damage roots. Let the top 2 inches of soil dry out completely between waterings (gnats need moisture to reproduce), use yellow sticky traps to catch adults, and consider a layer of sand or perlite on the soil surface as a physical barrier.
Nutrient deficiencies show up as yellowing leaves (nitrogen), purple-tinged leaves (phosphorus), or brown leaf edges (potassium). In soil, a balanced liquid fertilizer applied every 1–2 weeks usually resolves these. In hydroponics, check your nutrient solution concentration and pH first, since pH outside the 5.5–6.5 range locks out nutrients even when they’re present.
Mold and mildew develop in humid, poorly ventilated rooms. Run a small fan for a few hours daily, space plants so air can circulate between them, and avoid wetting foliage when watering. If you see white powdery patches on leaves, remove affected leaves immediately and improve airflow. In hydroponic reservoirs, keep the reservoir covered to block light (which promotes algae) and sanitize it completely during each reservoir change.
Safety note: Hydroponic systems involve water near electrical equipment. Use drip trays under all reservoirs, keep power strips elevated off the floor, and check connections regularly. Place systems away from upholstered furniture and rugs to avoid moisture damage.
The health claims around indoor gardening range from well-supported to significantly overstated. Here’s where the evidence is solid and where it gets thin.
Immune regulation and skin microbiota. A randomized intervention found that participants in an urban indoor gardening program using a microbially rich growing medium showed changes in immune-regulating markers and a more complex skin bacterial network compared with controls. The intervention group showed roughly three times the complexity in skin bacterial co-occurrence networks and a higher IL-10:IL-17A ratio. This is a meaningful finding, but it comes from a single study using a specific microbially rich medium, not standard potting soil. The mechanism is plausible (contact with diverse soil microbiota may influence immune signaling), but it hasn’t been replicated at scale yet.
Urban food security. The 2026 Frontiers in Sustainable Food Systems review on indoor vertical farming synthesizes technological and socioeconomic evidence that controlled-environment agriculture can meaningfully improve urban nutritional security. The key mechanism is precision resource management: water, light, and nutrients are controlled rather than weather-dependent, enabling consistent year-round production.
Psychological benefits. The evidence for stress reduction and mood improvement from indoor gardening is consistent across multiple studies. Healthline’s summary of science-backed benefits reflects a genuine body of research, not a single outlier study. The effect sizes are modest but reliable.
Where the evidence is thin. Air purification claims for indoor plants are often overstated. The Royal Horticultural Society notes that significant air-purifying effects require many plants under controlled conditions, not a few pots on a windowsill. Treat air quality as a bonus, not a primary reason to grow indoors.
Work through these questions before committing to a setup:
If/then guidance:
On energy trade-offs: LED grow lights are far more efficient than older fluorescent or HID systems. A well-chosen LED panel running 14 hours/day adds roughly $1.50–$2.50/month to your electricity bill. Use a timer to avoid running lights unnecessarily, and choose panels sized for your actual growing area rather than oversizing.
There’s a version of the indoor growing story that promises you’ll slash your grocery bill, purify your air, and achieve food self-sufficiency from a studio apartment. That version is mostly marketing.
What indoor growing actually delivers, consistently and reliably, is something more modest and more useful: fresh herbs whenever you need them, salad greens that taste better than anything you’ll find in a bag, and the satisfaction of eating something you grew yourself. For urban apartment dwellers, that’s not a small thing. It’s the difference between cooking with dried herbs from a jar and cooking with basil you cut two minutes ago.
The food security angle is real but proportional. A compact hydroponic setup won’t replace your grocery runs. It will meaningfully supplement your fresh produce intake, reduce your dependence on the most perishable and expensive items (fresh herbs, specialty greens), and give you a buffer when supply chains get unpredictable.
The health evidence is more interesting than most articles acknowledge. The randomized intervention linking microbially rich indoor growing to immune-regulating changes and skin microbiota complexity is a genuinely novel finding, not just a wellness claim. It’s early-stage evidence, but it points in a direction worth watching.
What I’d tell any urban grower starting out: begin with microgreens or herbs, get one successful harvest under your belt, and then decide whether to scale up. The people who quit indoor growing usually did too much too fast. The people who stick with it almost always started small.

The biggest friction point for most urban growers isn’t motivation. It’s figuring out which system actually fits their space, their schedule, and their goals without wasting money on equipment that ends up in a closet. Sprout-lab’s compact growing systems are built specifically for apartment and urban growers who want reliable results without a steep learning curve.
The product line addresses the four things that most often derail beginners:
Sprout-lab has completed over 25,000 orders with a 4.9/5 rating. Browse the full range of growing systems to find the setup that matches your space and goals, and place your first order today.
Yes, particularly for herbs, salad greens, and microgreens. These crops produce quickly, require modest equipment, and deliver fresher results than store-bought equivalents. Fruiting crops like tomatoes are possible but require more investment in lighting and space.
Microgreens are the easiest starting point: they’re ready in 7–14 days, need only a shallow tray and a bright window, and require no fertilizer during their short growing cycle. Herbs like chives and mint are a close second.
Large vining crops (full-size cucumbers, squash, melons) and full-size root crops (parsnips, large beets) are poor choices for indoor growing. They need more space, stronger light, and more consistent pollination management than most apartment setups can provide.
For nutritional density per square foot, microgreens (especially sunflower, broccoli, and pea shoots) are hard to beat. They contain concentrated nutrients relative to their size and are ready to eat within two weeks of sowing.
A basic windowsill herb and microgreens setup costs $10–$40. A shelf with an LED grow light runs $80–$200 and supports year-round salad greens. A compact hydroponic system starts at $150–$400+ and delivers the highest yield per square foot.