Free shipping for order over $50

Free shipping for order over $50
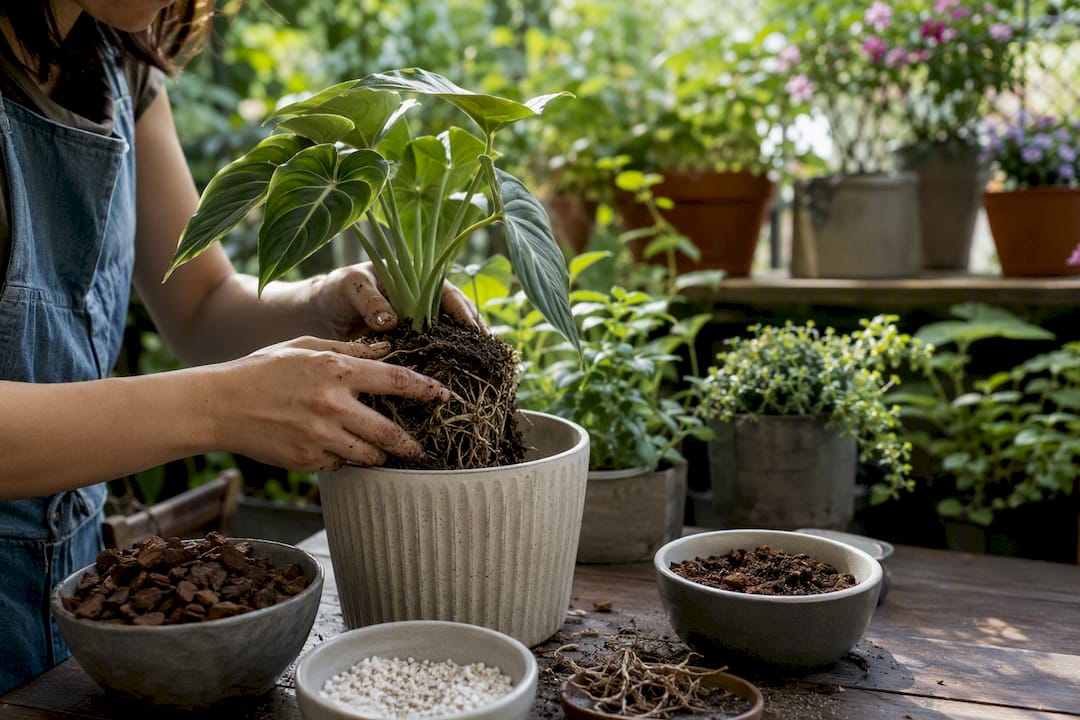
The most damaging aroid potting mix mistakes are using a peat heavy mix, losing aeration, and oversizing the pot. Fix these first by switching to a chunky, mineral forward mix, matching pot size to root mass, and refreshing the substrate every 18 to 24 months. Round out the fix list with two more repeat offenders: stale, gnat breeding organics sitting wet at the surface, and watering on autopilot after you’ve already switched to a fast draining mix.
Here’s the short version of each fix. Peat heavy or generic potting soil collapses and suffocates roots, so replace it with a chunky mix built on orchid bark, perlite, and coarse coir. A mix with too few chunky ingredients stays soggy, so add pumice or horticultural perlite until it drains fast. An oversized pot holds more wet soil than the roots can use, so size up by only 1 to 2 inches. Stale, decomposing organics breed fungus gnats and sour smells, so let the top layer dry and top dress with bark. And a watering schedule built for dense potting soil will drown a chunky mix, so check the pot’s actual weight and drainage speed instead of following a calendar.
Before you touch a bag of soil, run these three checks:
Most aroid potting mix failures come down to lost aeration, oversized pots, and watering habits that never adjusted after a substrate change.
| Point | Details |
|---|---|
| Ditch peat-heavy soil | Replace regular potting soil with a chunky, bark-based mix to prevent compaction and root rot. |
| Size pots correctly | Move up only 1 to 2 inches in diameter at each repot to avoid excess wet substrate. |
| Refresh on a schedule | Plan a partial or full mix refresh every 18 to 24 months, sooner if drainage slows. |
| Match watering to the mix | Check surface drain time and pot weight instead of watering on a fixed calendar. |
| Start with a tested recipe | Sprout-lab’s aroid-friendly soil mixes and raw materials are built to the same chunky, mineral-forward ratios covered here. |
Each of these mistakes compounds the others. A dense mix in an oversized pot is worse than either problem alone, which is why aroid root rot often shows up fast and seems to come from nowhere. It doesn’t. It’s usually the result of two or three of these stacking on top of one another for months before symptoms appear.
1. Using regular or peat heavy potting soil
Standard potting soil, including many bags labeled for houseplants, is built around peat moss and fine compost. That composition holds water well for annuals in garden beds, but for an epiphytic aroid root system it packs down and squeezes out the air pockets roots need. Most aroid root failures blamed on “overwatering” actually trace back to this loss of structure rather than water volume itself, according to a substrate guide from Foliage Factory. Symptoms include a sour, swampy smell at the surface, water sitting on top for over a minute before it sinks in, and roots that feel slimy rather than firm when you touch them.
The immediate fix is to unpot the plant, rinse the roots gently under lukewarm water, trim anything mushy, and repot into a chunky, bark based mix. Prevention going forward is simple: never buy a bag labeled “all purpose” or “indoor plant mix” for an aroid again. This is a fix now situation. If roots already smell sour, repot within 48 to 72 hours rather than waiting for the plant to show leaf symptoms.
2. Skimping on chunky, aerating ingredients
Even growers who know to avoid peat sometimes build a mix that’s still too fine. Coco coir alone, or coir with just a token handful of perlite, still compacts. A properly aerated aroid mix needs enough orchid bark, perlite, or pumice that air can move through it and roots can access oxygen between waterings. In active growth conditions, a well built chunky mix should re-aerate, meaning the surface dries and air returns to the pore spaces, in roughly 2 to 4 days rather than staying wet for a week or more, per Indoor Plant Care’s aroid mix guide.
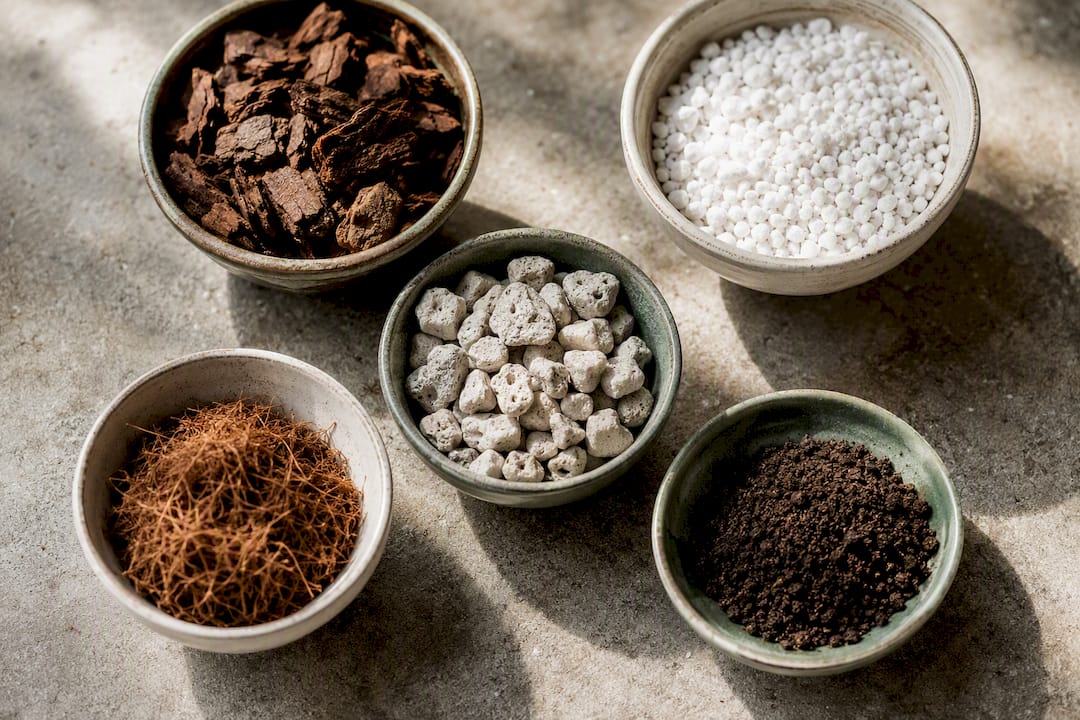
You’ll notice this mistake through slow drainage, a pot that stays heavy for days after watering, and new leaves emerging smaller than the last few. The fix is to work more coarse perlite or pumice into the existing mix by hand, roughly a cup per gallon of substrate for a moderate correction. Monitor over the next two to three waterings rather than repotting immediately unless roots already show damage.
3. Choosing a pot that’s too large
An oversized pot is one of the sneakiest mistakes because it looks generous, not harmful. The problem is volume: a pot with 3 or 4 extra inches of diameter holds substrate the roots can’t reach, and that unused substrate stays wet far longer than the root zone does. That excess moisture sits against the outer roots and invites rot even in a well aerated mix. You’ll see this as a plant that seems to need watering less and less often, paired with yellowing lower leaves and roots concentrated only in the center of the pot.
Fix it by sizing down at the next repot. Aroids do best moving up only 1 to 2 inches in diameter at a time, confirmed by Indoor Plant Care’s repotting guidance. If the plant is already in an oversized pot and showing stress, repot now into an appropriately sized container rather than waiting for the next scheduled refresh.
4. Never refreshing or replacing the substrate
Chunky mixes break down. Bark softens, perlite can settle toward the bottom over time, and organic fractions decompose into finer material that behaves more like regular soil. Bagged tropical mixes often compact within 12 to 18 months, and even a well built DIY chunky mix typically needs a partial refresh by 18 to 24 months, based on porosity research from The Planters’ Guild. Watch for a mix that looks visually finer than when you potted it, a pot that drains noticeably slower than it used to, or a plant that seems to need water more often despite no change in light or season.
The fix is a partial substrate swap: remove the top third to half of the old mix and replace it with fresh chunky substrate, without necessarily going through a full repot. This is a monitor and adjust situation, not an emergency, unless you also see root discoloration.
5. Watering on the old schedule after switching mixes
This mistake sneaks past a lot of otherwise careful growers. You upgrade to a proper aroid mix, then keep watering on the same weekly schedule you used for regular potting soil, and the plant either dries out too fast or, more commonly, gets watered again before the new mix has had a chance to dry. A chunky mix drains and dries faster, so the right cue is the pot’s weight and the surface drain test, not a calendar reminder.
Symptoms of overwatering a chunky mix look almost identical to underwatering a dense one: drooping leaves, slow growth, and yellowing. Check the top two inches of substrate with a finger or a wooden skewer before assuming the plant needs water. Adjust within the first two to three waterings after a mix change; this isn’t urgent, but it’s worth dialing in quickly.
6. Letting fungus gnats take over
Fungus gnats are a symptom, not a random pest problem. They breed in moist, high organic surface layers, particularly where decomposing bark or coir sits wet for days at a time. A mix with poor aeration at root depth makes this worse because the whole profile stays damp longer. You’ll know you have a gnat problem well before you see population numbers spike: tiny black flies near the soil surface, especially when you water or disturb the top layer.
The immediate fix is to let the top inch of substrate dry out completely between waterings and top dress with a layer of dry orchid bark, which removes the moist organic surface gnats need to lay eggs, according to Foliage Factory’s substrate research. Sticky traps handle the adult population while you fix the moisture issue underneath. Prevention is ongoing: keep addressing aeration at the root level, not just the surface, or gnats will return within weeks.
Pro Tip: Adding a layer of gravel or coarse bark at the bottom of the pot “for drainage” almost always backfires. Water won’t move from a fine layer into a coarser one until the fine layer is fully saturated first, a phenomenon called the perched water table. That drainage layer actually raises the wet zone right into the root ball. Skip it entirely and use one uniform, well built mix from top to bottom, a point backed by UC Master Gardeners’ research on container drainage.
7. Over-amending a pre-made mix
Bagged mixes like Miracle-Gro Indoor Potting Mix often already include slow release fertilizer and a reasonable amount of organic matter. Growers trying to build the “perfect” aroid substrate sometimes stack more compost, more worm castings, or an extra dose of slow release feed on top of an already balanced bag, and the mix ends up too rich and too moisture retentive. This shows up as salt crust on the surface, leaf tip burn, or a mix that stays damp far longer than it should for its ingredient list.
Fix it by flushing the pot with plain water to leach excess salts, then hold off on any additional fertilizer for four to six weeks. Going forward, treat a bagged mix as a finished product and adjust texture with mineral additions like perlite rather than piling on more organic amendments.
8. Reusing old or “sterilized” mix without rebuilding structure
Sterilizing old potting mix in an oven or microwave kills some pathogens, but it does nothing to restore the physical structure that’s already broken down. Growers who reuse old substrate because it’s “clean” often reintroduce the exact compaction problem that caused issues the first time. If a plant goes into reused mix and shows slow growth or recurring gnats within a few weeks, the substrate structure, not sterility, is the likely cause.
The fix is to treat reused mix as a base ingredient at most, mixed at no more than 25 to 30% into a batch of fresh chunky components, never used alone.
9. Ignoring pH and nutrient lockout
Most aroids do best in a substrate that’s slightly acidic, in the range of roughly pH 5.0 to 6.5, per Indoor Plant Care’s mix breakdown. When pH drifts too far outside that range, certain nutrients become chemically unavailable to the roots even if they’re present in the mix. This produces symptoms that look exactly like a deficiency: interveinal yellowing, stunted new growth, or pale leaves, even in a plant getting regular, balanced fertilizer.
If you’ve ruled out light, water, and pot size and a plant still shows deficiency symptoms, test the runoff pH before adding more fertilizer. Adjusting the mix, rather than piling on more nutrients, is usually the real fix.
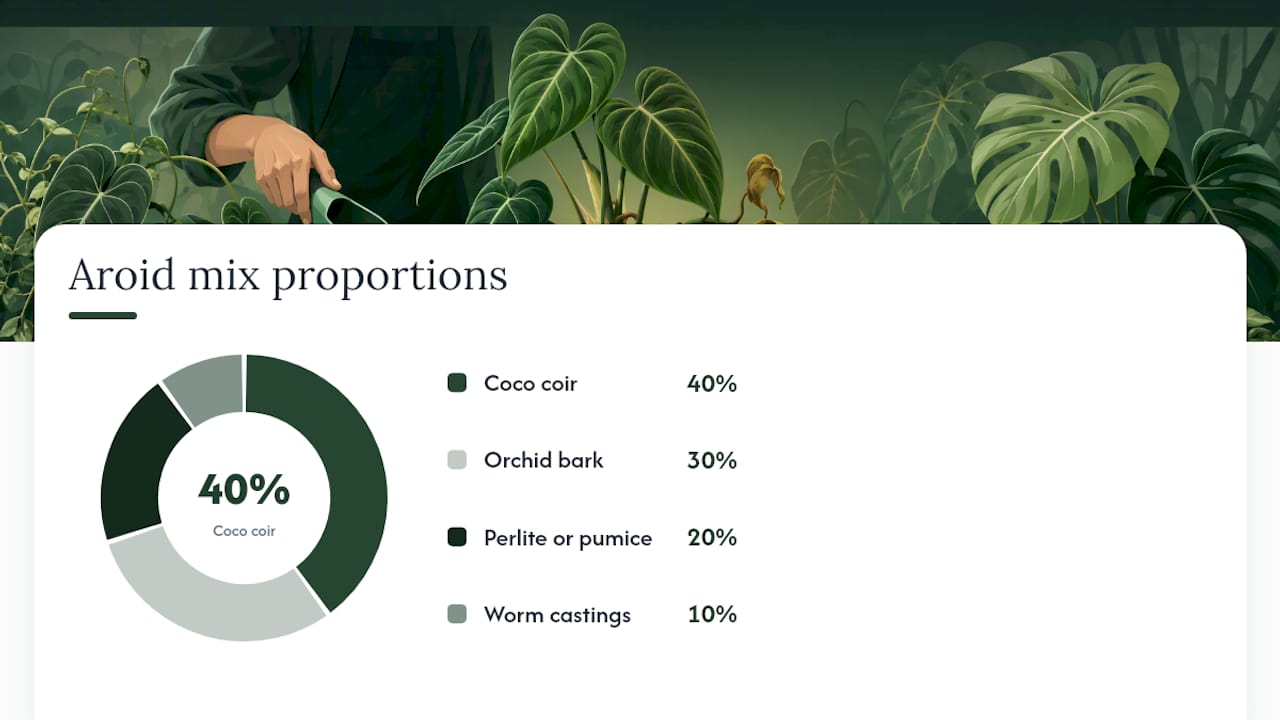
A reliable chunky aroid mix comes down to ratios you can scale, not guesswork. For a small 4 quart batch, that’s roughly 1.6 quarts coir, 1.2 quarts orchid bark, 0.8 quarts perlite, and 0.4 quarts worm castings. Scale those same percentages up for a 5 gallon batch if you’re repotting several plants at once.
| Ingredient | Share of mix | What it does |
|---|---|---|
| Coco coir or fine bark | 40% | Holds moisture without compacting like peat |
| Orchid bark | 30% | Creates air channels and structural bulk |
| Perlite or pumice | 20% | Drives drainage and long-term aeration |
| Worm castings | 10% | Adds mild, slow-release nutrition |
Ingredient choice matters as much as the ratio. Coarse, horticultural grade perlite holds its structure in a mature aroid’s pot far better than the fine perlite sold for seed starting, which breaks down faster. Pumice is a solid substitute where perlite floats to the surface after watering, since pumice has more weight and similar porosity. If you want extra cation exchange capacity for nutrient retention, a small percentage of zeolite works well swapped in for part of the worm castings.
Adjust the ratio by species and pot size. For sourcing the raw components yourself, horticultural perlite, pumice, and orchid bark are the three ingredients worth buying in bulk if you keep more than a couple of aroids.
Before potting anything, run the squeeze test: grab a damp handful of finished mix and squeeze. It should hold its shape for a second, then crumble apart on its own. If water drips out when you squeeze, the mix is too wet and needs 20 to 30 minutes to air dry before use. Dusty bark and mineral components benefit from a quick rinse or 10 minute soak before mixing in, which knocks down dust that would otherwise clog pore spaces. A full step-by-step aroid mix recipe walks through the process in more detail if you’re building your first batch.
Before you start, gather clean shears, the new pot (sized only 1 to 2 inches larger than the current one), your finished mix, and a bucket of room temperature water. Repot when you see roots circling the drainage holes, when the current mix has visibly compacted, or on the 18 to 24 month refresh timeline covered below.
For the next 7 to 14 days, check the plant daily for wilting, monitor that the pot isn’t staying wet for more than a few days at a time, and hold off on fertilizer until you see new growth. If roots showed heavy rot or a foul smell during inspection, treat the plant as high risk and consider isolating it from other aroids until you’re confident the rot hasn’t spread.
A chunky DIY mix typically holds its structure for about 1.5 to 2 years before it needs a partial or full refresh; many bagged commercial mixes compact sooner, often within around 1 to 1.5 years. Three quick tests tell you which action to take:
Mixes that fail these tests but still show healthy roots usually only need a top third to half refresh. A substrate porosity study found that container mixes holding at least roughly 20% air-filled porosity at container capacity perform best long term, while many commercial tropical blends test closer to 8 to 12% and compact well before the two-year mark.
A mix that stays wet for more than 7 to 10 days almost always points to a structural problem, lost air channels and collapsed pore space, rather than a simple overwatering habit. Treat the substrate and the root system as one connected unit: fix the structure, and the watering problem often resolves itself.
Bottom watering deserves a caveat here. It works well with a uniform, evenly chunky mix, because consistent particle size lets water wick upward through the whole profile. In an uneven mix, with pockets of fine coir next to chunks of bark, bottom watering can saturate only the lower zone while the upper roots stay dry and salts concentrate near the surface.
Pro Tip: Before relying on bottom watering for a given pot, test it once: water from the bottom, then check moisture at the very top of the mix two hours later. If the top inch is still bone dry, your mix isn’t uniform enough for that method yet.
Every mistake in this list traces back to the same root cause: substrate that can’t hold both moisture and air at the same time. That’s why, in-house, we lean toward mineral-heavy ratios over anything peat-based, and why customers moving their collections onto a proper aroid mix consistently report fewer gnats and steadier root growth within a season. Our complete guide to aroid substrate goes deeper into the ingredient science if you want it.
Building a batch from scratch teaches you a lot, but sourcing consistent, dust-free orchid bark and coarse perlite locally isn’t always easy, and getting the ratio wrong once usually means repotting again in six months. Sprout-lab’s aroid-friendly soil mixes are formulated with the same chunky, mineral-forward ratios covered above, tested for the air-filled porosity that keeps roots healthy well past the 18-month mark.

If you’d rather build your own, our raw planting mediums let you customize ratios by species without hunting down separate bags of bark, perlite, and coir. Either way, the fastest path to fewer repots and healthier roots is starting with a mix engineered for aroids instead of retrofitting a bag of generic potting soil. Browse the soil mix collection and pick the blend that matches what you’re growing.
A chunky, mineral-forward mix of roughly 40% coco coir, 30% orchid bark, 20% perlite or pumice, and 10% worm castings works well for most aroids, since it drains fast while still holding some moisture.
Avoid peat-heavy or generic potting soil, drainage layers of gravel at the pot’s base, and mixes with too little bark or perlite, since all three lead to compaction and slow drainage.
Bottom watering works reliably only with a uniform, evenly chunky mix; uneven mixes can leave the upper root zone dry while the bottom stays saturated, so test a pot before relying on it.
Not ideally. Moisture-loving aroids like Anthuriums can handle a slightly higher coir ratio, while larger climbers like Monstera need more bark and perlite for airflow through a bigger pot, so adjust ratios by species rather than using one fixed recipe everywhere.
A well-built chunky DIY mix typically lasts 18 to 24 months before it needs a partial refresh, while many bagged commercial mixes compact sooner, often within 12 to 18 months.